Samsung CLX-8380ND User Manual (user Manual) (ver.5.00) (English) - Page 81
First In, First Out, Image Quality Test Patterns - drum
 |
View all Samsung CLX-8380ND manuals
Add to My Manuals
Save this manual to your list of manuals |
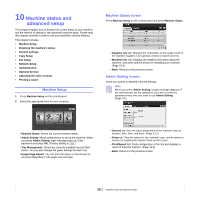
Page 81 highlights
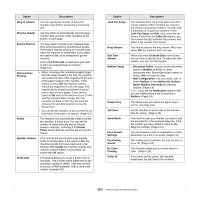
Option Power Saver Tray Management Altitude Adjustment Output Options Contention Management Description You can reduce energy consumption by setting these features. Power Saver has two options, first Low Power Save turns off the scanner lamp under the glass. Power Save turns off the fans within the machine except a core fan for the fuser unit. (Page 3.6) This feature allows you to select the tray and paper you use for a printing job. Paper size, paper type, and paper color options are adjusted here. Tray Confirmation Message is to activate the window asking whether you set the paper size and type for the just opened tray. • Auto Tray Switch: If tray1 and tray2 are filled with letter size paper, when tray1 is empty and this option is On, then the machine continues printing with paper in tray2. • Auto Continue: When the paper is mismatched, meaning that tray1has filled with the letter size paper, but the printing job needs A4 size paper, the machine will wait for 30 seconds to paper in tray1 with proper sized paper. After 30 seconds, the machine automatically starts printing with Letter sized paper. • Paper Substitution: When the paper is mismatched, this option sets the machine print A4 size paper in the Letter size paper or vice versa. • Wide A4: It is useful when printing in DOS mode. This option prints 80 charactors in a line, which printing 78 charactors in a line is usual in DOS mode. Print quality is affected by atmospheric pressure, which atmospheric pressure is determined by the height of the machine above sea level. This feature lets you adjust the altitude in a height district. Higher altitude location need to set this feature to High 3, which affects print quality. Output Options is for, when the staples run out, you to let the machine stop processing and wait to refill the staples or continue the job. If you set Within Job Offsetting to On, the output paper is placed and sorted by job unit. This feature lets you to select the priority between copy jobs and print jobs. • Priority: Set the priority by numbering the job. The machine starts from the least to the highest number in order. • First In, First Out: The machine does an asked job in order. Option Sound Supplies Management Machine Test On Demand Overwrite HDD Spoolling Stored Job File Policy Country Description You can adjust the loudness of the machine sound. Press Fault to adjust the machine's error sound. Select Conflict if you pressed the wrong option. Press Selection to sound whenever you press the selection from your touch screen. The machine gives you the notification of the drum and toner to reorder, and resets the used fuser counter, bias transfer roller, feed roller and document feeder friction pad counter. The machine prints the test image patterns using Image Quality Test Patterns. You can set the machine to delete previous job information on HDD as you store new job information. To activate this feature, go to Admin Setting > the Setup tab > Optional Service and set the On Demand Image Overwrite option to Enable. After activating this feature you can overwrite a HDD by pressing Start in the display. To spool documents in HDD for the network printing, select On. You can choose the file policy for generating file name before you proceed with the job through HDD. If the HDD memory already has the same name when you entered a new file name, you can rename or overwrite it. • Rename: If you HDD memory already has the same name when you enter a new file name, the file will be saved as a different name that is automatically programmed. • Overwrite: You can set the machine to delete previous job information on HDD as you store new job information You can change the country, then some the values for fax and paper size will be changed automatically for your country. After installing the fax kit, you must change the country. 10.3
-
 1
1 -
2
-
3
-
4
-
5
-
6
-
7
-
8
-
9
-
10
-
11
-
12
-
13
-
14
-
15
-
16
-
17
-
18
-
19
-
20
-
21
-
22
-
23
-
24
-
25
-
26
-
27
-
28
-
29
-
30
-
31
-
32
-
33
-
34
-
35
-
36
-
37
-
38
-
39
-
40
-
41
-
42
-
43
-
44
-
45
-
46
-
47
-
48
-
49
-
50
-
51
-
52
-
53
-
54
-
55
-
56
-
57
-
58
-
59
-
60
-
61
-
62
-
63
-
64
-
65
-
66
-
67
-
68
-
69
-
70
-
71
-
72
-
73
-
74
-
75
-
 76
76 -
 77
77 -
 78
78 -
 79
79 -
 80
80 -
 81
81 -
 82
82 -
 83
83 -
 84
84 -
 85
85 -
 86
86 -
87
-
88
-
89
-
90
-
91
-
92
-
93
-
94
-
95
-
96
-
97
-
98
-
99
-
100
-
101
-
102
-
103
-
104
-
105
-
106
-
107
-
108
-
109
-
110
-
111
-
112
-
113
-
114
-
115
-
116
-
117
-
118
-
119
-
120
-
121
-
122
-
123
-
124
-
125
-
126
-
127
-
128
-
129
-
130
-
131
-
132
-
133
-
134
-
135
-
136
-
137
-
138
-
139
-
140
-
141
-
142
-
143
-
144
-
145
-
146
-
147
-
148
-
149
-
150
-
151
-
152
-
153
-
154
-
155
-
156
-
157
-
158
-
159
-
160
-
161
-
162
-
163
-
164
-
165
-
166
-
167
-
168
-
169
-
170
-
171
-
172
-
173
-
174
-
175
-
176
-
177
-
178
-
179
-
180
-
181
-
182
-
183
-
184
-
185
-
186
-
187
 |
 |
