Samsung CLX-8380ND User Manual (user Manual) (ver.5.00) (English) - Page 34
Changing the font setting, Understanding the keyboard
 |
View all Samsung CLX-8380ND manuals
Add to My Manuals
Save this manual to your list of manuals |
Page 34 highlights
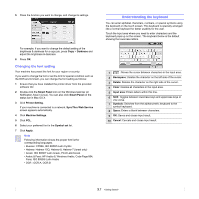
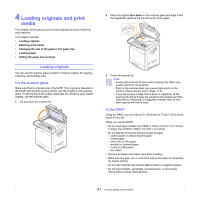
5 Press the function you want to change, and change its settings. For example, if you want to change the default setting of the brightness & darkness for a copy job, press Copy > Darkness and adjust the brightness & darkness. 6 Press OK. Changing the font setting Your machine has preset the font for your region or country. If you want to change the font or set the font for special condition such as the DOS environment, you can change the font setting as follows: 1 Ensure that you have installed the printer driver from the provided software CD. 2 Double-click the Smart Panel icon on the Windows task bar (or Notification Area in Linux). You can also click Smart Panel on the status bar in Mac OS X. 3 Click Printer Setting. If your machine is connected to a network, SyncThru Web Service screen appears automatically. 4 Click Machine Settings. 5 Click PCL. 6 Select your preferred font in the Symbol set list. 7 Click Apply. Note Following information shows the proper font list for corresponding languages. • Russian: CP866, ISO 8859/5 Latin Cyrillic • Hebrew: Hebrew 15Q, Hebrew-8, Hebrew-7 (Israel only) • Greek: ISO 8859/7 Latin Greek, PC-8 Latin/Greek • Arabic & Farsi: HP Arabic-8, Windows Arabic, Code Page 864, Farsi, ISO 8859/6 Latin Arabic • OCR : OCR-A, OCR-B Understanding the keyboard You can enter alphabet characters, numbers, or special symbols using the keyboard on the touch screen. This keyboard is specially arranged like a normal keyboard for better usability for the user. Touch the input area where you need to enter characters and the keyboard pops up on the screen. The keyboard below is the default showing the lowercase letters. 1 : Moves the cursor between characters in the input area. 2 Backspace: Deletes the character on the left side of the cursor. 3 Delete: Deletes the character on the right side of the cursor. 4 Clear: Deletes all characters in the input area. 5 Input area: Enters letters within this line. 6 Shift: Toggles between lowercase keys and uppercase keys or vice versa. 7 Symbols: Switches from the alphanumeric keyboard to the symbol keyboard. 8 Space: Enters a blank between characters. 9 OK: Saves and closes input result. 10 Cancel: Cancels and closes input result. 3.7
-
 1
1 -
2
-
3
-
4
-
5
-
6
-
7
-
8
-
9
-
10
-
11
-
12
-
13
-
14
-
15
-
16
-
17
-
18
-
19
-
20
-
21
-
22
-
23
-
24
-
25
-
26
-
27
-
28
-
 29
29 -
 30
30 -
 31
31 -
 32
32 -
 33
33 -
 34
34 -
 35
35 -
 36
36 -
 37
37 -
 38
38 -
 39
39 -
40
-
41
-
42
-
43
-
44
-
45
-
46
-
47
-
48
-
49
-
50
-
51
-
52
-
53
-
54
-
55
-
56
-
57
-
58
-
59
-
60
-
61
-
62
-
63
-
64
-
65
-
66
-
67
-
68
-
69
-
70
-
71
-
72
-
73
-
74
-
75
-
76
-
77
-
78
-
79
-
80
-
81
-
82
-
83
-
84
-
85
-
86
-
87
-
88
-
89
-
90
-
91
-
92
-
93
-
94
-
95
-
96
-
97
-
98
-
99
-
100
-
101
-
102
-
103
-
104
-
105
-
106
-
107
-
108
-
109
-
110
-
111
-
112
-
113
-
114
-
115
-
116
-
117
-
118
-
119
-
120
-
121
-
122
-
123
-
124
-
125
-
126
-
127
-
128
-
129
-
130
-
131
-
132
-
133
-
134
-
135
-
136
-
137
-
138
-
139
-
140
-
141
-
142
-
143
-
144
-
145
-
146
-
147
-
148
-
149
-
150
-
151
-
152
-
153
-
154
-
155
-
156
-
157
-
158
-
159
-
160
-
161
-
162
-
163
-
164
-
165
-
166
-
167
-
168
-
169
-
170
-
171
-
172
-
173
-
174
-
175
-
176
-
177
-
178
-
179
-
180
-
181
-
182
-
183
-
184
-
185
-
186
-
187
 |
 |