Samsung CLX-8380ND User Manual (user Manual) (ver.5.00) (English) - Page 95
Maintenance Parts, Items, Part Name, Yield Average - transfer belt
 |
View all Samsung CLX-8380ND manuals
Add to My Manuals
Save this manual to your list of manuals |
Page 95 highlights
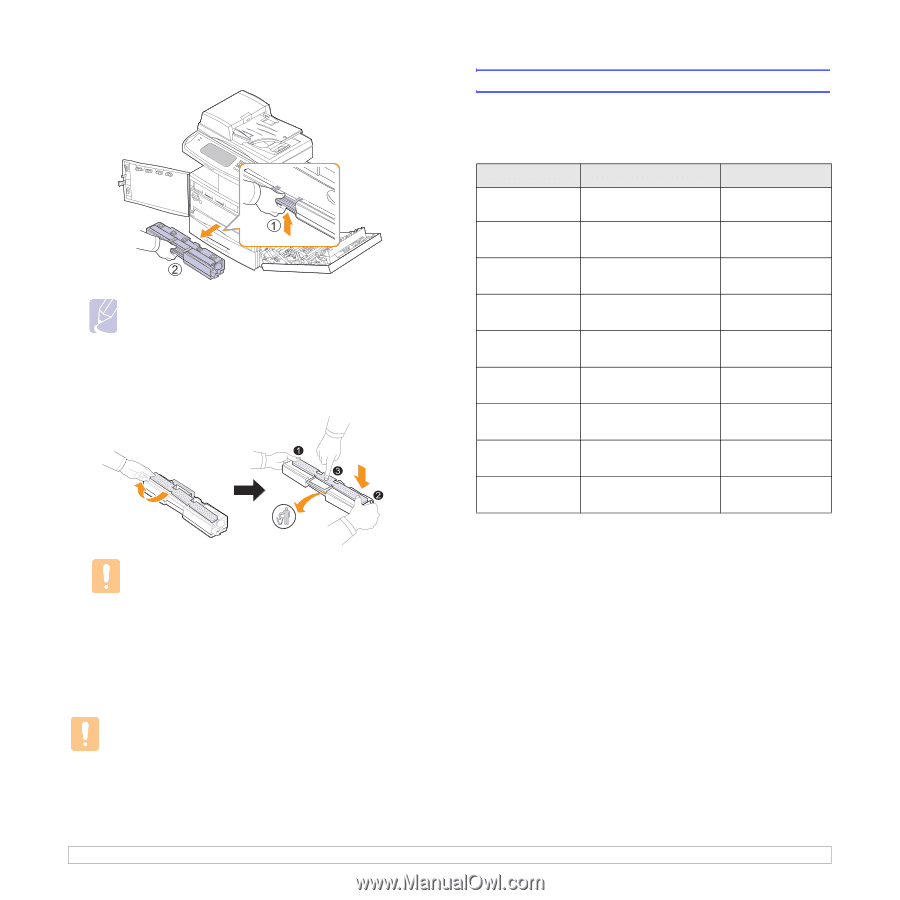
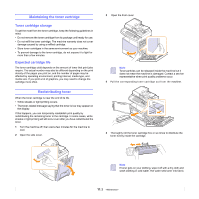
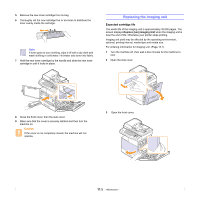
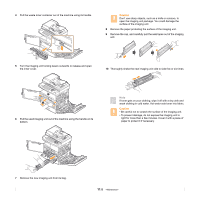
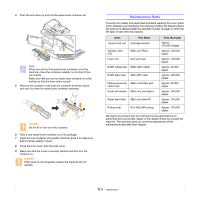
4 Push the lock lever up and pull the waste toner container out. Note When you pull out the waste toner container out of the machine, move the container carefully not to drop it from your hands. Make sure that you lay the waste toner container on a flat surface so that the toner does not spill. 5 Remove the container's cap from the container as shown below, and use it to close the waste toner container openings. Caution Do not tilt or turn over the container. 6 Take a new waste toner container out of its package. 7 Insert the new container into position and then push it to make sure that it is firmly seated in place. 8 Close the front cover, then the side cover. 9 Make sure that the cover is securely latched and then turn the machine on. Caution If the cover is not completely closed, the machine will not operate. Maintenance Parts To avoid print quality and paper feed problems resulting from worn parts and to maintain your machine in top working condition the following items will need to be replaced after the specified number of pages or when the life span of each item has expired. Items Transfer belt unit Part Name Cartridge-transfer Transfer roller (T2) Fuser unit MEA unit-TR(2) ELA unit fuser DADF rubber pad RMO-ADF rubber DADF feed roller MEA-ADF roller Multi-purpose tray MEA unit-holder pad rubber pad Guide exit duplex MEA unit_exit duplex Paper feed roller MEA unit-roller PU Pickup roller ELA HOU-MP pickup Yield (Average) Approx. 100,000 images Approx. 100,000 pages Approx. 100,000 pages Approx. 50,000 pages Approx. 200,000 pages Approx. 50,000 pages Approx. 100,000 pages Approx. 100,000 pages Approx. 100,000 pages We highly recommend that this maintenance be performed by an authorized service provider, dealer or the retailer where you bought the machine. The warranty does not cover the replacement of the maintenance parts after their lifespan. 11.8
-
 1
1 -
2
-
3
-
4
-
5
-
6
-
7
-
8
-
9
-
10
-
11
-
12
-
13
-
14
-
15
-
16
-
17
-
18
-
19
-
20
-
21
-
22
-
23
-
24
-
25
-
26
-
27
-
28
-
29
-
30
-
31
-
32
-
33
-
34
-
35
-
36
-
37
-
38
-
39
-
40
-
41
-
42
-
43
-
44
-
45
-
46
-
47
-
48
-
49
-
50
-
51
-
52
-
53
-
54
-
55
-
56
-
57
-
58
-
59
-
60
-
61
-
62
-
63
-
64
-
65
-
66
-
67
-
68
-
69
-
70
-
71
-
72
-
73
-
74
-
75
-
76
-
77
-
78
-
79
-
80
-
81
-
82
-
83
-
84
-
85
-
86
-
87
-
88
-
89
-
 90
90 -
 91
91 -
 92
92 -
 93
93 -
 94
94 -
 95
95 -
 96
96 -
 97
97 -
 98
98 -
 99
99 -
 100
100 -
101
-
102
-
103
-
104
-
105
-
106
-
107
-
108
-
109
-
110
-
111
-
112
-
113
-
114
-
115
-
116
-
117
-
118
-
119
-
120
-
121
-
122
-
123
-
124
-
125
-
126
-
127
-
128
-
129
-
130
-
131
-
132
-
133
-
134
-
135
-
136
-
137
-
138
-
139
-
140
-
141
-
142
-
143
-
144
-
145
-
146
-
147
-
148
-
149
-
150
-
151
-
152
-
153
-
154
-
155
-
156
-
157
-
158
-
159
-
160
-
161
-
162
-
163
-
164
-
165
-
166
-
167
-
168
-
169
-
170
-
171
-
172
-
173
-
174
-
175
-
176
-
177
-
178
-
179
-
180
-
181
-
182
-
183
-
184
-
185
-
186
-
187
 |
 |