HP Color LaserJet CM2320 Service Manual - Page 39
System setup menu continued, Table 2-5
 |
View all HP Color LaserJet CM2320 manuals
Add to My Manuals
Save this manual to your list of manuals |
Page 39 highlights
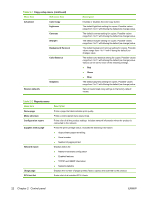
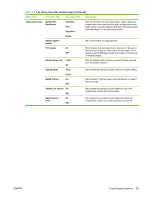
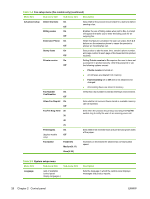
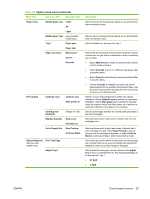
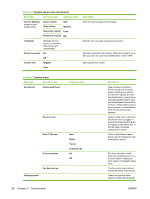
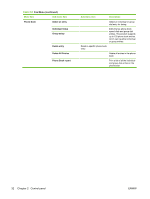
Table 2-5 System setup menu (continued) Menu Item Sub-menu item Sub-menu item Paper setup Default paper size Letter A4 Legal Default paper type Lists available media types. Tray 1 Paper type Paper size Paper out action Wait forever Cancel Override Print quality Calibrate color Calibrate now After power on Cartridge low threshold (Range of 1-20) Replace Supplies Stop at out Override out Color Supply Out Stop Printing Continue Black Adjust Alignment Print Test Page (memory-card models only) Adjust Tray 1 Description Sets the size for printing internal reports or any print job that does not specify a size. Sets the type for printing internal reports or any print job that does not specify a type. Sets the default size and type for Tray 1. Determines how the product reacts when a print job requires a media size or type that is unavailable or when a specified tray is empty. ● Select Wait forever to make the product wait until the correct media is loaded. ● Select Override to print on a different size paper after a specified delay. ● Select Cancel to automatically cancel the print job after a specified delay. ● If either Override or Cancel is chosen, the control panel prompts for the number of seconds to delay. Use the arrow keys to either decrease the time or increase the time up to 3,600 seconds. Perform a Color Pane Registration (CPR) and density calibration. Select Calibrate now to perform an immediate calibration. Select After power on to specify the minutes/ hours the product should wait after power on to perform an automatic calibration (the default is 15 minutes). Sets the percentage at which the control panel generates a low-toner message. Sets how the product reacts when it detects that the print cartridge is out. Sets how the product should react when it detects that a color cartridge is empty. Select Stop Printing to stop all printing until the cartridge is replaced, or select Continue Black to continue printing in black monochrome mode. Print out a tray-specific sheet of instructions and a test page with a border that can be used to estimate the adjustment needed to center the printed image on the page. After printing the test page, use the options in the Adjust Tray 1 menu to calibrate the tray. The following settings can be adjusted for Tray 1: ● X1 Shift ● Y Shift ENWW Control-panel menus 27
-
 1
1 -
2
-
3
-
4
-
5
-
6
-
7
-
8
-
9
-
10
-
11
-
12
-
13
-
14
-
15
-
16
-
17
-
18
-
19
-
20
-
21
-
22
-
23
-
24
-
25
-
26
-
27
-
28
-
29
-
30
-
31
-
32
-
33
-
 34
34 -
 35
35 -
 36
36 -
 37
37 -
 38
38 -
 39
39 -
 40
40 -
 41
41 -
 42
42 -
 43
43 -
 44
44 -
45
-
46
-
47
-
48
-
49
-
50
-
51
-
52
-
53
-
54
-
55
-
56
-
57
-
58
-
59
-
60
-
61
-
62
-
63
-
64
-
65
-
66
-
67
-
68
-
69
-
70
-
71
-
72
-
73
-
74
-
75
-
76
-
77
-
78
-
79
-
80
-
81
-
82
-
83
-
84
-
85
-
86
-
87
-
88
-
89
-
90
-
91
-
92
-
93
-
94
-
95
-
96
-
97
-
98
-
99
-
100
-
101
-
102
-
103
-
104
-
105
-
106
-
107
-
108
-
109
-
110
-
111
-
112
-
113
-
114
-
115
-
116
-
117
-
118
-
119
-
120
-
121
-
122
-
123
-
124
-
125
-
126
-
127
-
128
-
129
-
130
-
131
-
132
-
133
-
134
-
135
-
136
-
137
-
138
-
139
-
140
-
141
-
142
-
143
-
144
-
145
-
146
-
147
-
148
-
149
-
150
-
151
-
152
-
153
-
154
-
155
-
156
-
157
-
158
-
159
-
160
-
161
-
162
-
163
-
164
-
165
-
166
-
167
-
168
-
169
-
170
-
171
-
172
-
173
-
174
-
175
-
176
-
177
-
178
-
179
-
180
-
181
-
182
-
183
-
184
-
185
-
186
-
187
-
188
-
189
-
190
-
191
-
192
-
193
-
194
-
195
-
196
-
197
-
198
-
199
-
200
-
201
-
202
-
203
-
204
-
205
-
206
-
207
-
208
-
209
-
210
-
211
-
212
-
213
-
214
-
215
-
216
-
217
-
218
-
219
-
220
-
221
-
222
-
223
-
224
-
225
-
226
-
227
-
228
-
229
-
230
-
231
-
232
-
233
-
234
-
235
-
236
-
237
-
238
-
239
-
240
-
241
-
242
-
243
-
244
-
245
-
246
-
247
-
248
-
249
-
250
-
251
-
252
-
253
-
254
-
255
-
256
-
257
-
258
-
259
-
260
-
261
-
262
-
263
-
264
-
265
-
266
-
267
-
268
-
269
-
270
-
271
-
272
-
273
-
274
-
275
-
276
-
277
-
278
-
279
-
280
-
281
-
282
-
283
-
284
-
285
-
286
-
287
-
288
-
289
-
290
-
291
-
292
-
293
-
294
-
295
-
296
-
297
-
298
-
299
-
300
-
301
-
302
-
303
-
304
-
305
-
306
-
307
-
308
-
309
-
310
-
311
-
312
-
313
-
314
-
315
-
316
-
317
-
318
-
319
-
320
-
321
-
322
-
323
-
324
-
325
-
326
-
327
-
328
-
329
-
330
-
331
-
332
-
333
-
334
-
335
-
336
-
337
-
338
-
339
-
340
-
341
-
342
-
343
-
344
-
345
-
346
-
347
-
348
-
349
-
350
-
351
-
352
-
353
-
354
-
355
-
356
-
357
-
358
-
359
-
360
-
361
-
362
-
363
-
364
-
365
-
366
-
367
-
368
-
369
-
370
-
371
-
372
-
373
-
374
-
375
-
376
-
377
-
378
-
379
-
380
-
381
-
382
-
383
-
384
-
385
-
386
-
387
-
388
-
389
-
390
-
391
-
392
-
393
-
394
-
395
-
396
-
397
-
398
-
399
-
400
-
401
-
402
-
403
-
404
-
405
-
406
-
407
-
408
-
409
-
410
 |
 |
