HP Color LaserJet CM2320 Service Manual - Page 91
Clean the exterior, Firmware updates, Recover from a corrupted firmware download
 |
View all HP Color LaserJet CM2320 manuals
Add to My Manuals
Save this manual to your list of manuals |
Page 91 highlights
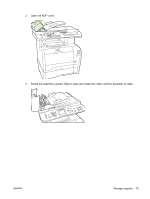
Clean the exterior Use a soft, damp, lint-free cloth to wipe dust, smudges, and stains off of the exterior of the product. Firmware updates Firmware updates and installation instructions for this product are available at www.hp.com/support/ CM2320series. Click Downloads and drivers, click the operating system, and then select the firmware download for the product. NOTE: Interrupting the firmware download can cause the product to cease operating. If you experience a firmware update error, see Recover from a corrupted firmware download on page 79. Recover from a corrupted firmware download This process does not require a service call. It can be performed by the customer. If the product power is interrupted during either the Erasing or Programming phases of the firmware download, the product will be unusable until the steps below are performed. If power interruption occurs, the message ready 2 Download appears on the control panel. NOTE: The product must be attached to the computer via USB, regardless of the current connection method. NOTE: The instructions below are for the Microsoft Windows operating system. If the product power is interrupted during the Erasing or Programming phase, the message ready 2 Download appears, and the Ready and Attention LEDs remain unlit after the product is powered back on. On the computer, the update tool will not indicate that a failure occurred during the update. The update tool will show that the download completed and might even have a yellow smiley face at the end of the progress bar. This is due to the lack of two-way communication between the computer and the product once the download begins. 1. Close the firmware update tool on the computer if it is still active on the screen, and then turn off the product. 2. If the product is on a network, connect a USB cable (2 meters or less) from the product to an open port on the computer. HP recommends that this be a direct connection instead of through a hub. 3. Turn on the product, and then wait for the message ready 2 Download to appear. 4. On the computer, cancel any alerts about a new device being connected. 5. On the computer, open the Printers and Faxes control panel. 6. Right-click the printer driver for the product model that is being updated, and then click Properties. 7. In the Properties dialog box, click the Ports tab. 8. Note the name of the port that the product is currently connected to for use later when reconnecting at the end of this process. 9. Click the check box next to USB001. If USB001 is already connected to another USB device, click USBXXX where "XXX" is the highest-numbered USB device that has a description of "Virtual printer port for USB". Using the scroll bars on the right side of the window might be necessary, depending on the number of devices installed. ENWW Manage supplies 79
-
 1
1 -
2
-
3
-
4
-
5
-
6
-
7
-
8
-
9
-
10
-
11
-
12
-
13
-
14
-
15
-
16
-
17
-
18
-
19
-
20
-
21
-
22
-
23
-
24
-
25
-
26
-
27
-
28
-
29
-
30
-
31
-
32
-
33
-
34
-
35
-
36
-
37
-
38
-
39
-
40
-
41
-
42
-
43
-
44
-
45
-
46
-
47
-
48
-
49
-
50
-
51
-
52
-
53
-
54
-
55
-
56
-
57
-
58
-
59
-
60
-
61
-
62
-
63
-
64
-
65
-
66
-
67
-
68
-
69
-
70
-
71
-
72
-
73
-
74
-
75
-
76
-
77
-
78
-
79
-
80
-
81
-
82
-
83
-
84
-
85
-
 86
86 -
 87
87 -
 88
88 -
 89
89 -
 90
90 -
 91
91 -
 92
92 -
 93
93 -
 94
94 -
 95
95 -
 96
96 -
97
-
98
-
99
-
100
-
101
-
102
-
103
-
104
-
105
-
106
-
107
-
108
-
109
-
110
-
111
-
112
-
113
-
114
-
115
-
116
-
117
-
118
-
119
-
120
-
121
-
122
-
123
-
124
-
125
-
126
-
127
-
128
-
129
-
130
-
131
-
132
-
133
-
134
-
135
-
136
-
137
-
138
-
139
-
140
-
141
-
142
-
143
-
144
-
145
-
146
-
147
-
148
-
149
-
150
-
151
-
152
-
153
-
154
-
155
-
156
-
157
-
158
-
159
-
160
-
161
-
162
-
163
-
164
-
165
-
166
-
167
-
168
-
169
-
170
-
171
-
172
-
173
-
174
-
175
-
176
-
177
-
178
-
179
-
180
-
181
-
182
-
183
-
184
-
185
-
186
-
187
-
188
-
189
-
190
-
191
-
192
-
193
-
194
-
195
-
196
-
197
-
198
-
199
-
200
-
201
-
202
-
203
-
204
-
205
-
206
-
207
-
208
-
209
-
210
-
211
-
212
-
213
-
214
-
215
-
216
-
217
-
218
-
219
-
220
-
221
-
222
-
223
-
224
-
225
-
226
-
227
-
228
-
229
-
230
-
231
-
232
-
233
-
234
-
235
-
236
-
237
-
238
-
239
-
240
-
241
-
242
-
243
-
244
-
245
-
246
-
247
-
248
-
249
-
250
-
251
-
252
-
253
-
254
-
255
-
256
-
257
-
258
-
259
-
260
-
261
-
262
-
263
-
264
-
265
-
266
-
267
-
268
-
269
-
270
-
271
-
272
-
273
-
274
-
275
-
276
-
277
-
278
-
279
-
280
-
281
-
282
-
283
-
284
-
285
-
286
-
287
-
288
-
289
-
290
-
291
-
292
-
293
-
294
-
295
-
296
-
297
-
298
-
299
-
300
-
301
-
302
-
303
-
304
-
305
-
306
-
307
-
308
-
309
-
310
-
311
-
312
-
313
-
314
-
315
-
316
-
317
-
318
-
319
-
320
-
321
-
322
-
323
-
324
-
325
-
326
-
327
-
328
-
329
-
330
-
331
-
332
-
333
-
334
-
335
-
336
-
337
-
338
-
339
-
340
-
341
-
342
-
343
-
344
-
345
-
346
-
347
-
348
-
349
-
350
-
351
-
352
-
353
-
354
-
355
-
356
-
357
-
358
-
359
-
360
-
361
-
362
-
363
-
364
-
365
-
366
-
367
-
368
-
369
-
370
-
371
-
372
-
373
-
374
-
375
-
376
-
377
-
378
-
379
-
380
-
381
-
382
-
383
-
384
-
385
-
386
-
387
-
388
-
389
-
390
-
391
-
392
-
393
-
394
-
395
-
396
-
397
-
398
-
399
-
400
-
401
-
402
-
403
-
404
-
405
-
406
-
407
-
408
-
409
-
410
 |
 |
