HP Designjet 4000 HP Designjet 4000 Printer Series - Quick Reference Guide - Page 115
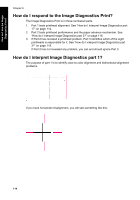
How do I print the Image Diagnostics Print?
 |
View all HP Designjet 4000 manuals
Add to My Manuals
Save this manual to your list of manuals |
Page 115 highlights
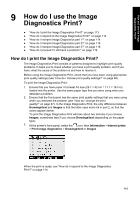
How do I use the Image Diagnostics Print? 9 How do I use the Image Diagnostics Print? ● "How do I print the Image Diagnostics Print?" on page 113 ● "How do I respond to the Image Diagnostics Print?" on page 114 ● "How do I interpret Image Diagnostics part 1?" on page 114 ● "How do I interpret Image Diagnostics part 2?" on page 116 ● "How do I interpret Image Diagnostics part 3?" on page 118 ● "How do I proceed if I still have a problem?" on page 119 How do I print the Image Diagnostics Print? The Image Diagnostics Print consists of patterns designed to highlight print quality problems. It helps you to check whether you have a print quality problem, and if you have, what the cause of the problem is and how to resolve it. Before using the Image Diagnostics Print, check that you have been using appropriate print quality settings (see "How do I choose print quality settings?" on page 68). To print the Image Diagnostics Print: 1. Ensure that you have paper of at least A3 size (29.7 × 42 cm = 11.7 × 16.5 in) loaded into the printer. Use the same paper type that you were using when you detected a problem. 2. Ensure that the front panel has the same print quality settings that you were using when you detected the problem (see "How do I change the print quality?" on page 67). In the Image Diagnostics Print, the only difference between Drawings/text and Images is that the latter uses more ink in part 2, so that the colors appear darker. To print the Image Diagnostics Print will take about two minutes if you choose Images; sometimes less if you choose Drawings/text (depending on the paper type). 3. At the printer's front panel, select the icon, then Information > Internal prints > Print image diagnostics > Drawings/text or Images. When the print is ready, see "How do I respond to the Image Diagnostics Print?" on page 114. 113
-
 1
1 -
2
-
3
-
4
-
5
-
6
-
7
-
8
-
9
-
10
-
11
-
12
-
13
-
14
-
15
-
16
-
17
-
18
-
19
-
20
-
21
-
22
-
23
-
24
-
25
-
26
-
27
-
28
-
29
-
30
-
31
-
32
-
33
-
34
-
35
-
36
-
37
-
38
-
39
-
40
-
41
-
42
-
43
-
44
-
45
-
46
-
47
-
48
-
49
-
50
-
51
-
52
-
53
-
54
-
55
-
56
-
57
-
58
-
59
-
60
-
61
-
62
-
63
-
64
-
65
-
66
-
67
-
68
-
69
-
70
-
71
-
72
-
73
-
74
-
75
-
76
-
77
-
78
-
79
-
80
-
81
-
82
-
83
-
84
-
85
-
86
-
87
-
88
-
89
-
90
-
91
-
92
-
93
-
94
-
95
-
96
-
97
-
98
-
99
-
100
-
101
-
102
-
103
-
104
-
105
-
106
-
107
-
108
-
109
-
 110
110 -
 111
111 -
 112
112 -
 113
113 -
 114
114 -
 115
115 -
 116
116 -
 117
117 -
 118
118 -
 119
119 -
 120
120 -
121
-
122
-
123
-
124
-
125
-
126
-
127
-
128
-
129
-
130
-
131
-
132
-
133
-
134
-
135
-
136
-
137
-
138
-
139
-
140
-
141
-
142
-
143
-
144
-
145
-
146
-
147
-
148
-
149
-
150
-
151
-
152
-
153
-
154
-
155
-
156
-
157
-
158
-
159
-
160
-
161
-
162
-
163
-
164
-
165
-
166
-
167
-
168
-
169
-
170
-
171
-
172
-
173
-
174
-
175
-
176
-
177
-
178
 |
 |