HP Designjet 4000 HP Designjet 4000 Printer Series - Quick Reference Guide - Page 53
How do I manage printhead monitoring?, How do I recover clean the printheads?, How do I clean - printhead cleaner
 |
View all HP Designjet 4000 manuals
Add to My Manuals
Save this manual to your list of manuals |
Page 53 highlights
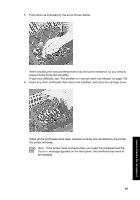
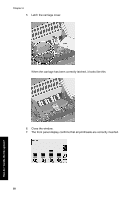
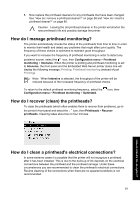
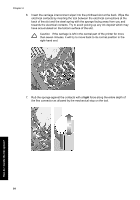
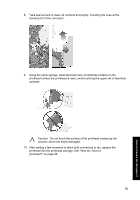
8. Now replace the printhead cleaners for any printheads that have been changed. See "How do I remove a printhead cleaner?" on page 58 and "How do I insert a printhead cleaner?" on page 60. Caution Leaving the old printhead cleaner in the printer will shorten the new printhead's life and possibly damage the printer. How do I manage printhead monitoring? The printer automatically checks the status of the printheads from time to time in order to monitor their health and detect any problems that might affect print quality. The frequency of these checks is optimized to maintain good throughput. If you want to increase the frequency of printhead monitoring in order to detect any problems sooner, select the icon, then Configuration menu > Printhead monitoring > Intensive. When the printer is printing and printhead monitoring is set to Intensive, the front panel and the Embedded Web Server printer status line will display the following message: Printing. Printhead monitoring (instead of just Printing). Note When Intensive is selected, the throughput of the printer will be reduced because of the increased frequency of printhead checks. To return to the default printhead monitoring frequency, select the icon, then Configuration menu > Printhead monitoring > Optimized. How do I recover (clean) the printheads? To clean the printheads (which often enables them to recover from problems), go to the printer's front panel and select the icon, then Printheads > Recover printheads. Cleaning takes about two to four minutes. How do I clean a printhead's electrical connections? In some extreme cases it is possible that the printer will not recognize a printhead after it has been installed. This is due to the build-up of ink deposits on the electrical connections between the printhead and the printhead carriage. Under these circumstances you are recommended to clean the printhead's electrical connections. Routine cleaning of the connections when there are no apparent problems is not recommended. 51 How do I handle the ink system?
-
 1
1 -
2
-
3
-
4
-
5
-
6
-
7
-
8
-
9
-
10
-
11
-
12
-
13
-
14
-
15
-
16
-
17
-
18
-
19
-
20
-
21
-
22
-
23
-
24
-
25
-
26
-
27
-
28
-
29
-
30
-
31
-
32
-
33
-
34
-
35
-
36
-
37
-
38
-
39
-
40
-
41
-
42
-
43
-
44
-
45
-
46
-
47
-
 48
48 -
 49
49 -
 50
50 -
 51
51 -
 52
52 -
 53
53 -
 54
54 -
 55
55 -
 56
56 -
 57
57 -
 58
58 -
59
-
60
-
61
-
62
-
63
-
64
-
65
-
66
-
67
-
68
-
69
-
70
-
71
-
72
-
73
-
74
-
75
-
76
-
77
-
78
-
79
-
80
-
81
-
82
-
83
-
84
-
85
-
86
-
87
-
88
-
89
-
90
-
91
-
92
-
93
-
94
-
95
-
96
-
97
-
98
-
99
-
100
-
101
-
102
-
103
-
104
-
105
-
106
-
107
-
108
-
109
-
110
-
111
-
112
-
113
-
114
-
115
-
116
-
117
-
118
-
119
-
120
-
121
-
122
-
123
-
124
-
125
-
126
-
127
-
128
-
129
-
130
-
131
-
132
-
133
-
134
-
135
-
136
-
137
-
138
-
139
-
140
-
141
-
142
-
143
-
144
-
145
-
146
-
147
-
148
-
149
-
150
-
151
-
152
-
153
-
154
-
155
-
156
-
157
-
158
-
159
-
160
-
161
-
162
-
163
-
164
-
165
-
166
-
167
-
168
-
169
-
170
-
171
-
172
-
173
-
174
-
175
-
176
-
177
-
178
 |
 |