HP Designjet 4000 HP Designjet 4000 Printer Series - Quick Reference Guide - Page 75
How do I change the palette settings?
 |
View all HP Designjet 4000 manuals
Add to My Manuals
Save this manual to your list of manuals |
Page 75 highlights
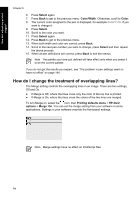
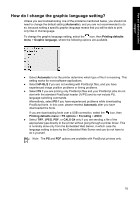
How do I adjust my printed images? You can rescale an image in the following ways: ● Using a Windows printer driver: select the Effects tab, then Resizing options. - The Print document on option (with Scale to fit checked) adjusts the image size to the page size selected for your printer. For example, if you have selected ISO A2 as the page size and you print an A4-size image, it will be enlarged to fit the A2 page. If the ISO A3 page size is selected, the printer would reduce a larger image to fit the A3 size. - The % of normal size option enlarges the printable area of the original page by the percentage indicated and adds the printer margins to make up the output page size. ● Using a Mac OS printer driver: select the Finishing panel, then Print document on. No Scale to fit option is displayed, because it is permanently on: the driver always adjusts the image size to the page size selected for your printer. ● Using the Embedded Web Server: select the Submit Job page, then Scaling. ● Using the front panel: select the icon, then Printing defaults menu > Paper options > Scale. If you are printing to a single sheet, you must ensure that the image can actually fit onto the page, otherwise clipping will occur. How do I change the palette settings? You cannot change the Factory palette, but you can define Palettes A and B to be whatever you choose. These palettes will be applied only to HP-GL/2 jobs with no software palette embedded. Note All HP-GL/2 jobs generated by the HP-GL/2 driver that comes with the printer will include an embedded software palette, and thus any palette settings in the front panel will be ignored. To redefine Palette A: 1. Go to the front panel, select the icon, then Printing defaults menu > HPGL/2 options > Define palette > Palette A. 2. Scroll to the pen number you want to change and press Select. 3. The current width assigned to this pen is displayed, for example Width=0.35 mm. If you want to change it: 4. Press Select. 5. Scroll to the width you want. 73
-
 1
1 -
2
-
3
-
4
-
5
-
6
-
7
-
8
-
9
-
10
-
11
-
12
-
13
-
14
-
15
-
16
-
17
-
18
-
19
-
20
-
21
-
22
-
23
-
24
-
25
-
26
-
27
-
28
-
29
-
30
-
31
-
32
-
33
-
34
-
35
-
36
-
37
-
38
-
39
-
40
-
41
-
42
-
43
-
44
-
45
-
46
-
47
-
48
-
49
-
50
-
51
-
52
-
53
-
54
-
55
-
56
-
57
-
58
-
59
-
60
-
61
-
62
-
63
-
64
-
65
-
66
-
67
-
68
-
69
-
 70
70 -
 71
71 -
 72
72 -
 73
73 -
 74
74 -
 75
75 -
 76
76 -
 77
77 -
 78
78 -
 79
79 -
 80
80 -
81
-
82
-
83
-
84
-
85
-
86
-
87
-
88
-
89
-
90
-
91
-
92
-
93
-
94
-
95
-
96
-
97
-
98
-
99
-
100
-
101
-
102
-
103
-
104
-
105
-
106
-
107
-
108
-
109
-
110
-
111
-
112
-
113
-
114
-
115
-
116
-
117
-
118
-
119
-
120
-
121
-
122
-
123
-
124
-
125
-
126
-
127
-
128
-
129
-
130
-
131
-
132
-
133
-
134
-
135
-
136
-
137
-
138
-
139
-
140
-
141
-
142
-
143
-
144
-
145
-
146
-
147
-
148
-
149
-
150
-
151
-
152
-
153
-
154
-
155
-
156
-
157
-
158
-
159
-
160
-
161
-
162
-
163
-
164
-
165
-
166
-
167
-
168
-
169
-
170
-
171
-
172
-
173
-
174
-
175
-
176
-
177
-
178
 |
 |