HP Designjet 4000 HP Designjet 4000 Printer Series - Quick Reference Guide - Page 92
Application settings, Color Settings, Working spaces, Color Management Policies, Rendering Intent,
 |
View all HP Designjet 4000 manuals
Add to My Manuals
Save this manual to your list of manuals |
Page 92 highlights
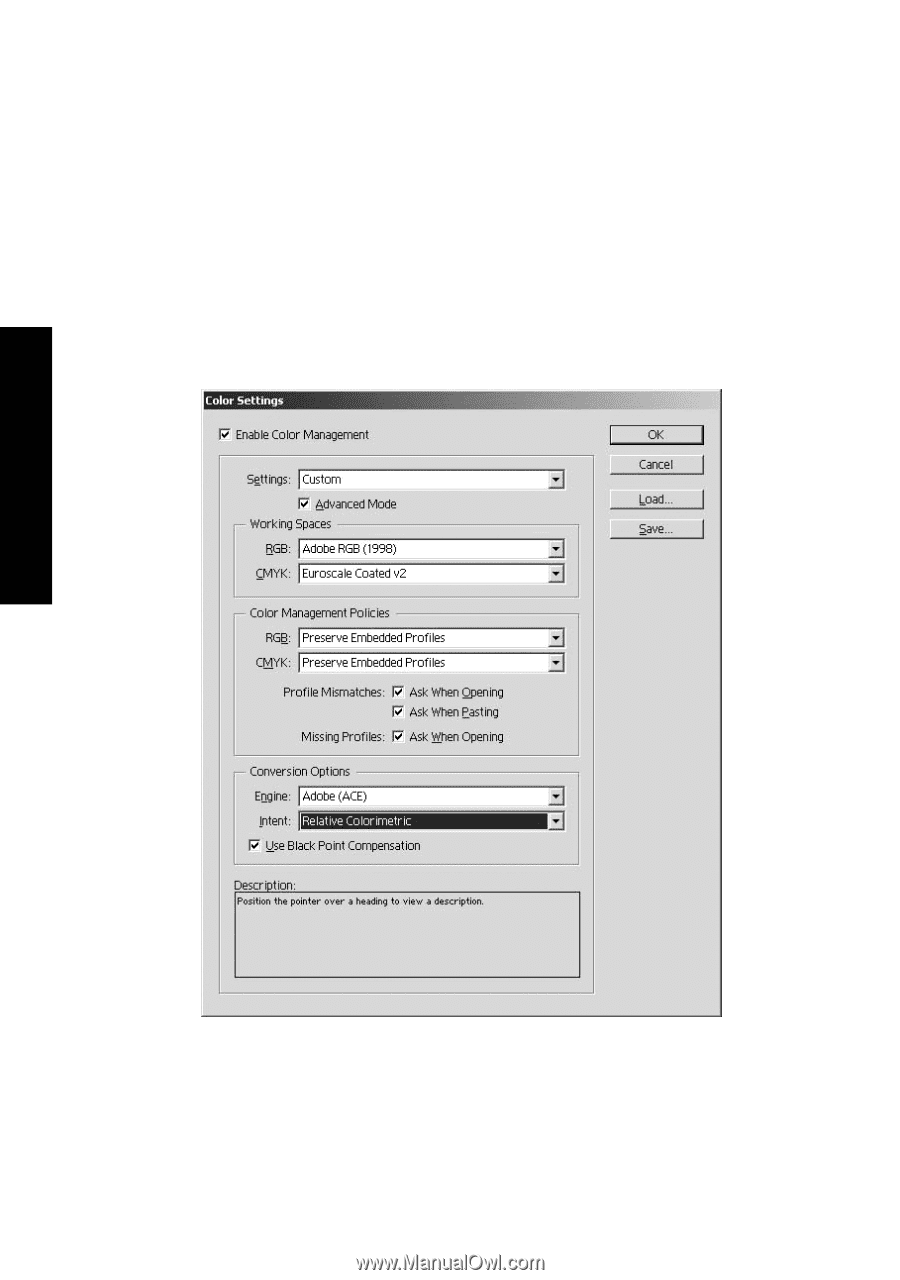
How do I get accurate colors from my printer? Chapter 6 Application settings 1. Open Adobe InDesign and select Color Settings from the Edit menu. - Working spaces: the working space is the color space you want to use when manipulating the image. We recommend using the color space that comes with the image (see Color Management Policies below), if any; otherwise, our recommended default settings are: RGB: Adobe RGB 1998, CMYK: SWOP for the USA and Euroscale Coated v2 for the rest of the world. - Color Management Policies: select 'Preserve Embedded Profiles'. - Rendering Intent: see "How do I set the rendering intent?" on page 78. - Black Point Compensation: this option is recommended if you have chosen the Relative Colorimetric rendering intent. See "How do I perform black point compensation?" on page 78. 2. Create or open the image with its own or the most appropriate color space. Then retouch the image as needed. 3. When you have the image ready to send to the output device, that is the moment to simulate on your printer what will appear on the output device. You must 90
-
 1
1 -
2
-
3
-
4
-
5
-
6
-
7
-
8
-
9
-
10
-
11
-
12
-
13
-
14
-
15
-
16
-
17
-
18
-
19
-
20
-
21
-
22
-
23
-
24
-
25
-
26
-
27
-
28
-
29
-
30
-
31
-
32
-
33
-
34
-
35
-
36
-
37
-
38
-
39
-
40
-
41
-
42
-
43
-
44
-
45
-
46
-
47
-
48
-
49
-
50
-
51
-
52
-
53
-
54
-
55
-
56
-
57
-
58
-
59
-
60
-
61
-
62
-
63
-
64
-
65
-
66
-
67
-
68
-
69
-
70
-
71
-
72
-
73
-
74
-
75
-
76
-
77
-
78
-
79
-
80
-
81
-
82
-
83
-
84
-
85
-
86
-
 87
87 -
 88
88 -
 89
89 -
 90
90 -
 91
91 -
 92
92 -
 93
93 -
 94
94 -
 95
95 -
 96
96 -
 97
97 -
98
-
99
-
100
-
101
-
102
-
103
-
104
-
105
-
106
-
107
-
108
-
109
-
110
-
111
-
112
-
113
-
114
-
115
-
116
-
117
-
118
-
119
-
120
-
121
-
122
-
123
-
124
-
125
-
126
-
127
-
128
-
129
-
130
-
131
-
132
-
133
-
134
-
135
-
136
-
137
-
138
-
139
-
140
-
141
-
142
-
143
-
144
-
145
-
146
-
147
-
148
-
149
-
150
-
151
-
152
-
153
-
154
-
155
-
156
-
157
-
158
-
159
-
160
-
161
-
162
-
163
-
164
-
165
-
166
-
167
-
168
-
169
-
170
-
171
-
172
-
173
-
174
-
175
-
176
-
177
-
178
 |
 |