HP Designjet 4000 HP Designjet 4000 Printer Series - Quick Reference Guide - Page 76
How do I change the treatment of overlapping lines?
 |
View all HP Designjet 4000 manuals
Add to My Manuals
Save this manual to your list of manuals |
Page 76 highlights
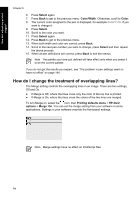
How do I adjust my printed images? Chapter 5 6. Press Select again. 7. Press Back to get to the previous menu: Color/Width. Otherwise, scroll to Color. 8. The current color assigned to the pen is displayed, for example Color=110. If you want to change it: 9. Press Select. 10. Scroll to the color you want. 11. Press Select again. 12. Press Back to get to the previous menu. 13. When both width and color are correct, press Back. 14. Scroll to the next pen number you want to change, press Select and then repeat the above process. 15. When all pen definitions are correct, press Back to exit the menus. Note The palette you have just defined will take effect only when you select it to be the current palette. If you do not get the results you expect, see "The problem is pen settings seem to have no effect" on page 144. How do I change the treatment of overlapping lines? The Merge setting controls the overlapping lines in an image. There are two settings, Off and On. ● If Merge is Off, where the lines cross only the color of the top line is printed. ● If Merge is On, where the lines cross the colors of the two lines are merged. To turn Merge on, select the icon, then Printing defaults menu > HP-GL/2 options > Merge: On. You can set the merge setting from your software in some applications. Settings in your software override the front-panel settings. Note Merge settings have no effect on PostScript files. 74
-
 1
1 -
2
-
3
-
4
-
5
-
6
-
7
-
8
-
9
-
10
-
11
-
12
-
13
-
14
-
15
-
16
-
17
-
18
-
19
-
20
-
21
-
22
-
23
-
24
-
25
-
26
-
27
-
28
-
29
-
30
-
31
-
32
-
33
-
34
-
35
-
36
-
37
-
38
-
39
-
40
-
41
-
42
-
43
-
44
-
45
-
46
-
47
-
48
-
49
-
50
-
51
-
52
-
53
-
54
-
55
-
56
-
57
-
58
-
59
-
60
-
61
-
62
-
63
-
64
-
65
-
66
-
67
-
68
-
69
-
70
-
 71
71 -
 72
72 -
 73
73 -
 74
74 -
 75
75 -
 76
76 -
 77
77 -
 78
78 -
 79
79 -
 80
80 -
 81
81 -
82
-
83
-
84
-
85
-
86
-
87
-
88
-
89
-
90
-
91
-
92
-
93
-
94
-
95
-
96
-
97
-
98
-
99
-
100
-
101
-
102
-
103
-
104
-
105
-
106
-
107
-
108
-
109
-
110
-
111
-
112
-
113
-
114
-
115
-
116
-
117
-
118
-
119
-
120
-
121
-
122
-
123
-
124
-
125
-
126
-
127
-
128
-
129
-
130
-
131
-
132
-
133
-
134
-
135
-
136
-
137
-
138
-
139
-
140
-
141
-
142
-
143
-
144
-
145
-
146
-
147
-
148
-
149
-
150
-
151
-
152
-
153
-
154
-
155
-
156
-
157
-
158
-
159
-
160
-
161
-
162
-
163
-
164
-
165
-
166
-
167
-
168
-
169
-
170
-
171
-
172
-
173
-
174
-
175
-
176
-
177
-
178
 |
 |