HP Designjet 4000 HP Designjet 4000 Printer Series - Quick Reference Guide - Page 124
Print Patterns
 |
View all HP Designjet 4000 manuals
Add to My Manuals
Save this manual to your list of manuals |
Page 124 highlights
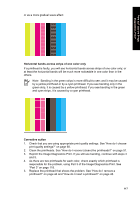
How do I perform paper advance calibration? Chapter 10 The calibration process in detail 1. Load the printer with the type of paper that you plan to use for printing subsequently. The paper must be at least 41 cm wide (16 in) and 75 cm long (30 in). 2. Select the or icon, and then Paper advance calibration. 3. Select Drawings/text or Images, depending on the type of prints you wish to make subsequently. Note It is very important to use the same setting that you will later use for printing in the driver, the Embedded Web Server, or the front panel (Optimized for drawings/text or Optimized for images). Otherwise the calibration has no effect. 4. Select Print Patterns. The printer will print a series of numbered patterns (1 to 7), each looking like this if you selected Drawings/text: or like this if you selected Images: 5. The Drawings/text print takes about three minutes, the Images print takes about five minutes. When the calibration print has finished printing, the printer will cut the paper. 122
-
 1
1 -
2
-
3
-
4
-
5
-
6
-
7
-
8
-
9
-
10
-
11
-
12
-
13
-
14
-
15
-
16
-
17
-
18
-
19
-
20
-
21
-
22
-
23
-
24
-
25
-
26
-
27
-
28
-
29
-
30
-
31
-
32
-
33
-
34
-
35
-
36
-
37
-
38
-
39
-
40
-
41
-
42
-
43
-
44
-
45
-
46
-
47
-
48
-
49
-
50
-
51
-
52
-
53
-
54
-
55
-
56
-
57
-
58
-
59
-
60
-
61
-
62
-
63
-
64
-
65
-
66
-
67
-
68
-
69
-
70
-
71
-
72
-
73
-
74
-
75
-
76
-
77
-
78
-
79
-
80
-
81
-
82
-
83
-
84
-
85
-
86
-
87
-
88
-
89
-
90
-
91
-
92
-
93
-
94
-
95
-
96
-
97
-
98
-
99
-
100
-
101
-
102
-
103
-
104
-
105
-
106
-
107
-
108
-
109
-
110
-
111
-
112
-
113
-
114
-
115
-
116
-
117
-
118
-
 119
119 -
 120
120 -
 121
121 -
 122
122 -
 123
123 -
 124
124 -
 125
125 -
 126
126 -
 127
127 -
 128
128 -
 129
129 -
130
-
131
-
132
-
133
-
134
-
135
-
136
-
137
-
138
-
139
-
140
-
141
-
142
-
143
-
144
-
145
-
146
-
147
-
148
-
149
-
150
-
151
-
152
-
153
-
154
-
155
-
156
-
157
-
158
-
159
-
160
-
161
-
162
-
163
-
164
-
165
-
166
-
167
-
168
-
169
-
170
-
171
-
172
-
173
-
174
-
175
-
176
-
177
-
178
 |
 |
