HP Designjet 4000 HP Designjet 4000 Printer Series - Quick Reference Guide - Page 60
How do I remove a printhead cleaner?
 |
View all HP Designjet 4000 manuals
Add to My Manuals
Save this manual to your list of manuals |
Page 60 highlights
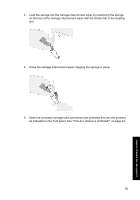
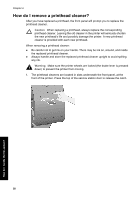
Chapter 4 How do I remove a printhead cleaner? After you have replaced a printhead, the front panel will prompt you to replace the printhead cleaner. Caution When replacing a printhead, always replace the corresponding printhead cleaner. Leaving the old cleaner in the printer will seriously shorten the new printhead's life and possibly damage the printer. A new printhead cleaner is provided with each new printhead. When removing a printhead cleaner: ● Be careful not to get ink on your hands. There may be ink on, around, and inside the replaced printhead cleaner. ● Always handle and store the replaced printhead cleaner upright to avoid spilling any ink. Warning Make sure the printer wheels are locked (the brake lever is pressed down) to prevent the printer from moving. 1. The printhead cleaners are located in slots underneath the front panel, at the front of the printer. Press the top of the service station door to release the catch. 58 How do I handle the ink system?
-
 1
1 -
2
-
3
-
4
-
5
-
6
-
7
-
8
-
9
-
10
-
11
-
12
-
13
-
14
-
15
-
16
-
17
-
18
-
19
-
20
-
21
-
22
-
23
-
24
-
25
-
26
-
27
-
28
-
29
-
30
-
31
-
32
-
33
-
34
-
35
-
36
-
37
-
38
-
39
-
40
-
41
-
42
-
43
-
44
-
45
-
46
-
47
-
48
-
49
-
50
-
51
-
52
-
53
-
54
-
 55
55 -
 56
56 -
 57
57 -
 58
58 -
 59
59 -
 60
60 -
 61
61 -
 62
62 -
 63
63 -
 64
64 -
 65
65 -
66
-
67
-
68
-
69
-
70
-
71
-
72
-
73
-
74
-
75
-
76
-
77
-
78
-
79
-
80
-
81
-
82
-
83
-
84
-
85
-
86
-
87
-
88
-
89
-
90
-
91
-
92
-
93
-
94
-
95
-
96
-
97
-
98
-
99
-
100
-
101
-
102
-
103
-
104
-
105
-
106
-
107
-
108
-
109
-
110
-
111
-
112
-
113
-
114
-
115
-
116
-
117
-
118
-
119
-
120
-
121
-
122
-
123
-
124
-
125
-
126
-
127
-
128
-
129
-
130
-
131
-
132
-
133
-
134
-
135
-
136
-
137
-
138
-
139
-
140
-
141
-
142
-
143
-
144
-
145
-
146
-
147
-
148
-
149
-
150
-
151
-
152
-
153
-
154
-
155
-
156
-
157
-
158
-
159
-
160
-
161
-
162
-
163
-
164
-
165
-
166
-
167
-
168
-
169
-
170
-
171
-
172
-
173
-
174
-
175
-
176
-
177
-
178
 |
 |
