Kyocera FS-9100DN FS-9100/9500 Operation Guide Rev-1.3 - Page 31
ENTER, Deleting a Stored Job, Printing a List of Code Jobs, Retrieving Jobs from Virtual Mailbox VMB - fs drivers
 |
UPC - 632983001066
View all Kyocera FS-9100DN manuals
Add to My Manuals
Save this manual to your list of manuals |
Page 31 highlights
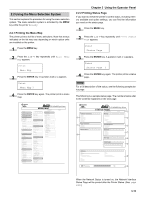
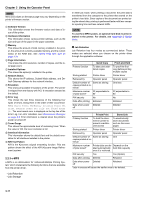
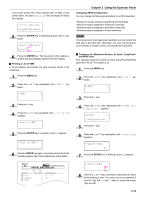
Chapter 3 Using the Operator Panel 9 Press the ENTER key. If you entered an access code for the printer driver, the ID input line appears. Enter the four-digit access code entered in the printer driver. To enter the ID, Press the 1 or 2 key to move the cursor to the number to be changed and then enter the correct number by pressing the 3 or 4 key. >Agenda ID 0000 10 Press the ENTER key. You can specify the number of copies to print. To increase the copy count, press the 3 key; to decrease the 4 key. >Agenda Copies 001 11 Press the ENTER key to finalize the copy count. The printer prints the specified number of copies for the job. >Agenda ?Copies 001 Q Deleting a Stored Job 1 Follow steps 1 through 8 in the above section. 2 When the title of the job to be printed is displayed (Agenda, in this example), press the ENTER key. >Agenda Copies 001 3 Press the 4 key repeatedly until Delete appears for the number of copies. >Agenda Delete 4 Press the ENTER key. The stored job is deleted from the hard disk. Printing a List of Code Jobs If you select Permanent Job Storage on the printer driver, you can have a List of Code Job printed using the operator panel. The List of Code Job may be used to read the barcode ID for the stored job you want to reprint by using a barcode reader. See Appendix D Option Units. A sample Code Job List is shown on page 3-15. 1 Press the MENU key. 3-15 2 Press the 3 or 4 key repeatedly until e-MPS > appears. e-MPS > 3 Press the 2 key. 4 Press the 3 or 4 key repeatedly until >List of Code JOB appears. >List of Code JOB 5 Press the ENTER key. A question mark (?) appears. >List of Code JOB ? 6 Press the ENTER key again. The printer prints a Code Job list as shown below. FS-9500DN Page Printer PERMANENT CODE JOB LIST Retrieving Jobs from Virtual Mailbox (VMB) To retrieve the jobs posted in the virtual mailbox, proceed as follows. 1 Press the MENU key. 2 Press the 3 or 4 key repeatedly until e-MPS > appears. e-MPS > 3 Press the 2 key. 4 Press the 3 or 4 key repeatedly until >Print VMB Data appears. The virtual mailbox number will also appear. >Print VMB Data Tray001:
-
 1
1 -
2
-
3
-
4
-
5
-
6
-
7
-
8
-
9
-
10
-
11
-
12
-
13
-
14
-
15
-
16
-
17
-
18
-
19
-
20
-
21
-
22
-
23
-
24
-
25
-
 26
26 -
 27
27 -
 28
28 -
 29
29 -
 30
30 -
 31
31 -
 32
32 -
 33
33 -
 34
34 -
 35
35 -
 36
36 -
37
-
38
-
39
-
40
-
41
-
42
-
43
-
44
-
45
-
46
-
47
-
48
-
49
-
50
-
51
-
52
-
53
-
54
-
55
-
56
-
57
-
58
-
59
-
60
-
61
-
62
-
63
-
64
-
65
-
66
-
67
-
68
-
69
-
70
-
71
-
72
-
73
-
74
-
75
-
76
-
77
-
78
-
79
-
80
-
81
-
82
-
83
-
84
-
85
-
86
-
87
-
88
-
89
-
90
-
91
-
92
-
93
-
94
-
95
-
96
-
97
-
98
-
99
-
100
-
101
-
102
-
103
-
104
-
105
-
106
-
107
-
108
-
109
-
110
-
111
-
112
-
113
-
114
-
115
-
116
-
117
-
118
-
119
-
120
-
121
-
122
-
123
-
124
-
125
-
126
-
127
-
128
-
129
-
130
-
131
-
132
-
133
-
134
-
135
-
136
-
137
-
138
-
139
-
140
-
141
-
142
-
143
 |
 |