Kyocera FS-9100DN FS-9100/9500 Operation Guide Rev-1.3 - Page 93
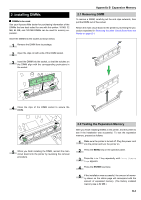
Appendix B Expansion Memory, 1. Removing the Main Circuit Board
 |
UPC - 632983001066
View all Kyocera FS-9100DN manuals
Add to My Manuals
Save this manual to your list of manuals |
Page 93 highlights
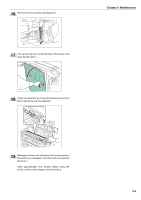
Appendix B Expansion Memory This appendix first explains how to remove the main circuit board and then how to install a DIMM (Dual In-line Memory Module) on the main circuit board. Expanded printer memory enables you to print more complex pages, download more fonts, and define more macros. 1. Removing the Main Circuit Board The main circuit board of the printer is equipped with two sockets for memory expansion. Expansion memory is available in the form of DIMMs. NOTE The expansion memory should be installed only by a Kyocera Mita authorized dealer or Kyocera Mita certified technician. Kyocera Mita shall not be liable for damage due to improper installation of the expansion memory. The following instructions are intended for the technician only. 1.2 Removing the Main Circuit Board from the Printer Remove the main circuit board completely from the printer as follows: 1 Turn off the printer and disconnect the power cord and printer cable. 2 Remove the two screws from the printer. 1.1 Notes on Handling the Main Circuit Board and DIMM Protect the electronics by taking these precautions: • Before touching the main circuit board and DIMM, touch a water pipe or other large metal object to discharge yourself of static electricity. While doing the work, it is recommended that you wear an antistatic wrist strap. • Touch the main circuit board and DIMM only at the edges. YES NO 3 Pull the main circuit board all the way out of the printer. NOTE Before pulling the main circuit board out, clear away the area, behind the printer. Foreign objects, accidentally sticking to the back of the main circuit board, can cause serious damage to the printer. B-1
-
 1
1 -
2
-
3
-
4
-
5
-
6
-
7
-
8
-
9
-
10
-
11
-
12
-
13
-
14
-
15
-
16
-
17
-
18
-
19
-
20
-
21
-
22
-
23
-
24
-
25
-
26
-
27
-
28
-
29
-
30
-
31
-
32
-
33
-
34
-
35
-
36
-
37
-
38
-
39
-
40
-
41
-
42
-
43
-
44
-
45
-
46
-
47
-
48
-
49
-
50
-
51
-
52
-
53
-
54
-
55
-
56
-
57
-
58
-
59
-
60
-
61
-
62
-
63
-
64
-
65
-
66
-
67
-
68
-
69
-
70
-
71
-
72
-
73
-
74
-
75
-
76
-
77
-
78
-
79
-
80
-
81
-
82
-
83
-
84
-
85
-
86
-
87
-
 88
88 -
 89
89 -
 90
90 -
 91
91 -
 92
92 -
 93
93 -
 94
94 -
 95
95 -
 96
96 -
 97
97 -
 98
98 -
99
-
100
-
101
-
102
-
103
-
104
-
105
-
106
-
107
-
108
-
109
-
110
-
111
-
112
-
113
-
114
-
115
-
116
-
117
-
118
-
119
-
120
-
121
-
122
-
123
-
124
-
125
-
126
-
127
-
128
-
129
-
130
-
131
-
132
-
133
-
134
-
135
-
136
-
137
-
138
-
139
-
140
-
141
-
142
-
143
 |
 |