Kyocera FS-9100DN FS-9100/9500 Operation Guide Rev-1.3 - Page 67
>Buzzer, Others, >Auto Continue >, Mode ? Off, Timer, ENTER, Auto Continue Setting
 |
UPC - 632983001066
View all Kyocera FS-9100DN manuals
Add to My Manuals
Save this manual to your list of manuals |
Page 67 highlights
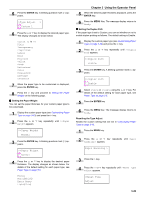
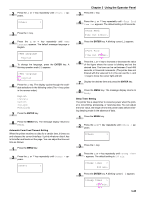
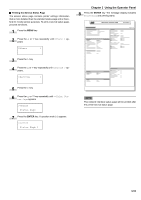
Chapter 3 Using the Operator Panel 5 Press the ENTER key. A blinking question mark (?) appears. >Buzzer ? On 6 Select On or Off using the 3 or 4 key. 7 Press the ENTER key. 8 Press the MENU key. The message display returns to Ready. Auto Continue Setting If an error that still allows you to continue printing occurs (Memory overflow Press GO, Print overrun Press GO, KPDL error Press GO, and File not found Press GO), the next received data is automatically printed after a set period of time elapses. For example, if the printer is shared over a network as a network printer and one person causes one of the above errors, after the set period of time elapses, the data sent from the next person is printed. The factory setting is off. For setting the auto continue recovery time, see the next section. 1 Press the MENU key. 2 Press the 3 or 4 key repeatedly until Others > appears. Others > 3 Press the 2 key. 4 Press the 3 or 4 key repeatedly until Auto Continue > appears. >Auto Continue > Mode Off 5 Press the ENTER key. A blinking question mark (?) appears. >Auto Continue Mode ? Off 6 Select On or Off using the 3 or 4 key. 7 Press the ENTER key. 8 Press the MENU key. The message display returns to Ready. Q Setting the Auto Continue Recovery Time Follow the procedure given below to change the recovery time for Auto Continue. 1 Press the MENU key. 2 Press the 3 or 4 key repeatedly until Others > appears. Others > 3 Press the 2 key. 4 Press the 3 or 4 key repeatedly until Auto Continue Mode > appears. >Auto Continue > Mode On 5 Press the 2 key and display >>Auto Continue Timer. 6 Press the ENTER key. A blinking cursor (_) appears. >>Auto Continue Timer 030Sec. 7 Press the 3 or 4 key to increase or decrease the value of the figure where the cursor is blinking and set the desired time. The time must be set between 000 and 495 seconds, in 5-second increments. If set to 000, printing will be continued immediately without allowing any time interval. You can use the 2 and 1 keys to move the cursor right and left. 8 Display the desired time and press the ENTER key. 9 Press the MENU key. The message display returns to Ready. Service Menu The service menu contains maintenance operations to be performed by service personnel. The Print Status Page, Developer, and Drum menus appear; however, in general, you will only need to use the Print Status Page menus. 3-51
-
 1
1 -
2
-
3
-
4
-
5
-
6
-
7
-
8
-
9
-
10
-
11
-
12
-
13
-
14
-
15
-
16
-
17
-
18
-
19
-
20
-
21
-
22
-
23
-
24
-
25
-
26
-
27
-
28
-
29
-
30
-
31
-
32
-
33
-
34
-
35
-
36
-
37
-
38
-
39
-
40
-
41
-
42
-
43
-
44
-
45
-
46
-
47
-
48
-
49
-
50
-
51
-
52
-
53
-
54
-
55
-
56
-
57
-
58
-
59
-
60
-
61
-
 62
62 -
 63
63 -
 64
64 -
 65
65 -
 66
66 -
 67
67 -
 68
68 -
 69
69 -
 70
70 -
 71
71 -
 72
72 -
73
-
74
-
75
-
76
-
77
-
78
-
79
-
80
-
81
-
82
-
83
-
84
-
85
-
86
-
87
-
88
-
89
-
90
-
91
-
92
-
93
-
94
-
95
-
96
-
97
-
98
-
99
-
100
-
101
-
102
-
103
-
104
-
105
-
106
-
107
-
108
-
109
-
110
-
111
-
112
-
113
-
114
-
115
-
116
-
117
-
118
-
119
-
120
-
121
-
122
-
123
-
124
-
125
-
126
-
127
-
128
-
129
-
130
-
131
-
132
-
133
-
134
-
135
-
136
-
137
-
138
-
139
-
140
-
141
-
142
-
143
 |
 |