Kyocera FS-9100DN FS-9100/9500 Operation Guide Rev-1.3 - Page 39
Emulation, PCL 6, >Print KPDL Errs, KC-GL, >KC-GL, Pen Width, >>Pen1 Width, ENTER
 |
UPC - 632983001066
View all Kyocera FS-9100DN manuals
Add to My Manuals
Save this manual to your list of manuals |
Page 39 highlights
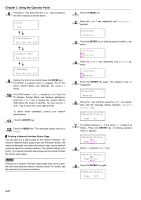
Chapter 3 Using the Operator Panel 8 Press the 3 or 4 key repeatedly until the desired alternative emulation appears. 9 Press the ENTER key. 10 Press the MENU key. The message display returns to Ready. Auto Printing of KPDL Error The printer can be set to print error data during KPDL emulation. If this is set to On, error data will be printed only when trouble occurs during printing. The factory default setting is Off. 1 Press the MENU key. 2 Press the 3 or 4 key repeatedly until Emulation > appears. Emulation > PCL 6 3 Press the ENTER key. A blinking question mark (?) appears. Emulation ?PCL 6 4 Select KPDL or KPDL (AUTO) using the 3 or 4 key. Emulation ?KPDL 5 Press the ENTER key. 6 Press the 2 key. The message display changes to that shown below. If >Print KPDL Errs is displayed when the KPDL (AUTO) emulation is selected, press the 3 or 4 key to change it. >Print KPDL Errs Off 7 Press the ENTER key. A blinking question mark (?) appears. >Print KPDL Errs ?Off 8 Select On using the 3 or 4 key. 3-23 >Print KPDL Errs ?On 9 Press the ENTER key. 10 Press the MENU key. The message display returns to Ready. KC-GL Pen Width The KC-GL emulation mode enables you to set the pen widths in dots, for pen numbers 1 to 8, and the KC-GL page size. 1 Press the MENU key. 2 Press the 3 or 4 key repeatedly until Emulation appears on the message display. Emulation > PCL 6 3 If the current emulation is other than KC-GL, press the ENTER key. A blinking question mark (?) appears. Emulation ?PCL 6 4 Press the 3 or 4 key repeatedly until KC-GL appears. Emulation ?KC-GL 5 Press the ENTER key. Emulation > KC-GL 6 Press the 2 key to move to the >KC-GL Pen Width submenu. >KC-GL > Pen Width 7 Press the 2 key. >>Pen(1) Width 01 dot(s) 8 Press the 3 or 4 key repeatedly until the desired pen number of 1 to 8 appears. 9 When the desired pen number is displayed, press the ENTER key.
-
 1
1 -
2
-
3
-
4
-
5
-
6
-
7
-
8
-
9
-
10
-
11
-
12
-
13
-
14
-
15
-
16
-
17
-
18
-
19
-
20
-
21
-
22
-
23
-
24
-
25
-
26
-
27
-
28
-
29
-
30
-
31
-
32
-
33
-
 34
34 -
 35
35 -
 36
36 -
 37
37 -
 38
38 -
 39
39 -
 40
40 -
 41
41 -
 42
42 -
 43
43 -
 44
44 -
45
-
46
-
47
-
48
-
49
-
50
-
51
-
52
-
53
-
54
-
55
-
56
-
57
-
58
-
59
-
60
-
61
-
62
-
63
-
64
-
65
-
66
-
67
-
68
-
69
-
70
-
71
-
72
-
73
-
74
-
75
-
76
-
77
-
78
-
79
-
80
-
81
-
82
-
83
-
84
-
85
-
86
-
87
-
88
-
89
-
90
-
91
-
92
-
93
-
94
-
95
-
96
-
97
-
98
-
99
-
100
-
101
-
102
-
103
-
104
-
105
-
106
-
107
-
108
-
109
-
110
-
111
-
112
-
113
-
114
-
115
-
116
-
117
-
118
-
119
-
120
-
121
-
122
-
123
-
124
-
125
-
126
-
127
-
128
-
129
-
130
-
131
-
132
-
133
-
134
-
135
-
136
-
137
-
138
-
139
-
140
-
141
-
142
-
143
 |
 |