Kyocera FS-9100DN FS-9100/9500 Operation Guide Rev-1.3 - Page 98
RS-232C Cable Connection, 4.1 Preparing an RS-232C Cable, 4.2 Connecting the RS-232C Cable
 |
UPC - 632983001066
View all Kyocera FS-9100DN manuals
Add to My Manuals
Save this manual to your list of manuals |
Page 98 highlights
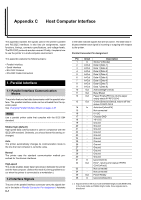
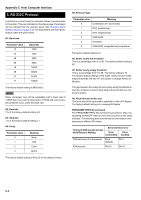
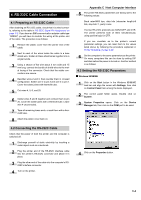
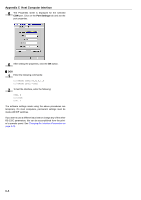
4. RS-232C Cable Connection 4.1 Preparing an RS-232C Cable After obtaining an RS-232C cable, check that it is wired correctly, referring to the table in RS-232C Signal Pin Assignment on page C-2. If you have an IBM communication adapter cable type 1502067, you will have to resolder the wiring at the printer end of the cable. The procedure is as follows. 1 Remove the plastic cover from the printer end of the cable. 2 Next to each of the wires inside the cable is a bare shield wire. Solder all these shield wires together into a single bundle. 3 Using a section of flat wire about 3 mm wide and 15 mm long, connect the bundle of shield wires to the metal facing of the connector. Check that the solder connections are secure. 4 Desolder wires 2 and 3, then resolder them in crossed configuration. Solder wire 2 to pin 3 and wire 3 to pin 2. Cover the solder joints with thermofit tube. 5 Cut wires 4, 5, 6, and 20. 6 Solder wires 5 and 6 together and connect them to pin 20. Cover the solder joints with a thermofit tube. Leave wire 4 unconnected. 7 Tape all remaining loose ends, or seal them with a thermofit tube. 8 Attach the plastic cover back on. 4.2 Connecting the RS-232C Cable Check that the power of both the printer and the computer is switched off. 1 Discharge yourself of static electricity by touching a metal object such as a doorknob. 2 Plug the printer end of the RS-232C interface cable into the printer's RS-232C connector and attach it in place. 3 Plug the other end of the cable into the computer's RS232C interface connector. 4 Turn on the printer. Appendix C Host Computer Interface 5 The printer RS-232C parameters are factory-set to the following values: Baud rate=9600 bps, data bits (character length)=8 bits, stop bits=1, parity=none The two RS-232C protocols are XON/XOFF and DTR. The printer performs both of them simultaneously, using positive logic for DTR. If you are uncertain as to the printer's current parameter settings, you can reset them to the values listed above by following the procedure explained in Printer Resetting on page 3-49. 6 Set the computer to the same parameters as the printer. On many computers this can be done by setting DIP switches before the power is turned on. Another method is as follows: 4.3 Setting the RS-232C Parameters Q Windows 95/98/ME 1 Click on the Start button in the Windows 95/98/ME task bar and align the cursor with Settings, then click on Control Panel from among the items displayed. 2 The control panel folder opens. Double click on System. 3 System Properties opens. Click on the Device Manager tab, then click on the COM port to be used. 4 Click on the Properties button. C-4
-
 1
1 -
2
-
3
-
4
-
5
-
6
-
7
-
8
-
9
-
10
-
11
-
12
-
13
-
14
-
15
-
16
-
17
-
18
-
19
-
20
-
21
-
22
-
23
-
24
-
25
-
26
-
27
-
28
-
29
-
30
-
31
-
32
-
33
-
34
-
35
-
36
-
37
-
38
-
39
-
40
-
41
-
42
-
43
-
44
-
45
-
46
-
47
-
48
-
49
-
50
-
51
-
52
-
53
-
54
-
55
-
56
-
57
-
58
-
59
-
60
-
61
-
62
-
63
-
64
-
65
-
66
-
67
-
68
-
69
-
70
-
71
-
72
-
73
-
74
-
75
-
76
-
77
-
78
-
79
-
80
-
81
-
82
-
83
-
84
-
85
-
86
-
87
-
88
-
89
-
90
-
91
-
92
-
 93
93 -
 94
94 -
 95
95 -
 96
96 -
 97
97 -
 98
98 -
 99
99 -
 100
100 -
 101
101 -
 102
102 -
 103
103 -
104
-
105
-
106
-
107
-
108
-
109
-
110
-
111
-
112
-
113
-
114
-
115
-
116
-
117
-
118
-
119
-
120
-
121
-
122
-
123
-
124
-
125
-
126
-
127
-
128
-
129
-
130
-
131
-
132
-
133
-
134
-
135
-
136
-
137
-
138
-
139
-
140
-
141
-
142
-
143
 |
 |