Kyocera KM-C3232E Fax System (N) Operation Guide Rev-1.2 - Page 202
Turning Remote Diagnosis ON/OFF (Remote Diagnosis setting
 |
View all Kyocera KM-C3232E manuals
Add to My Manuals
Save this manual to your list of manuals |
Page 202 highlights
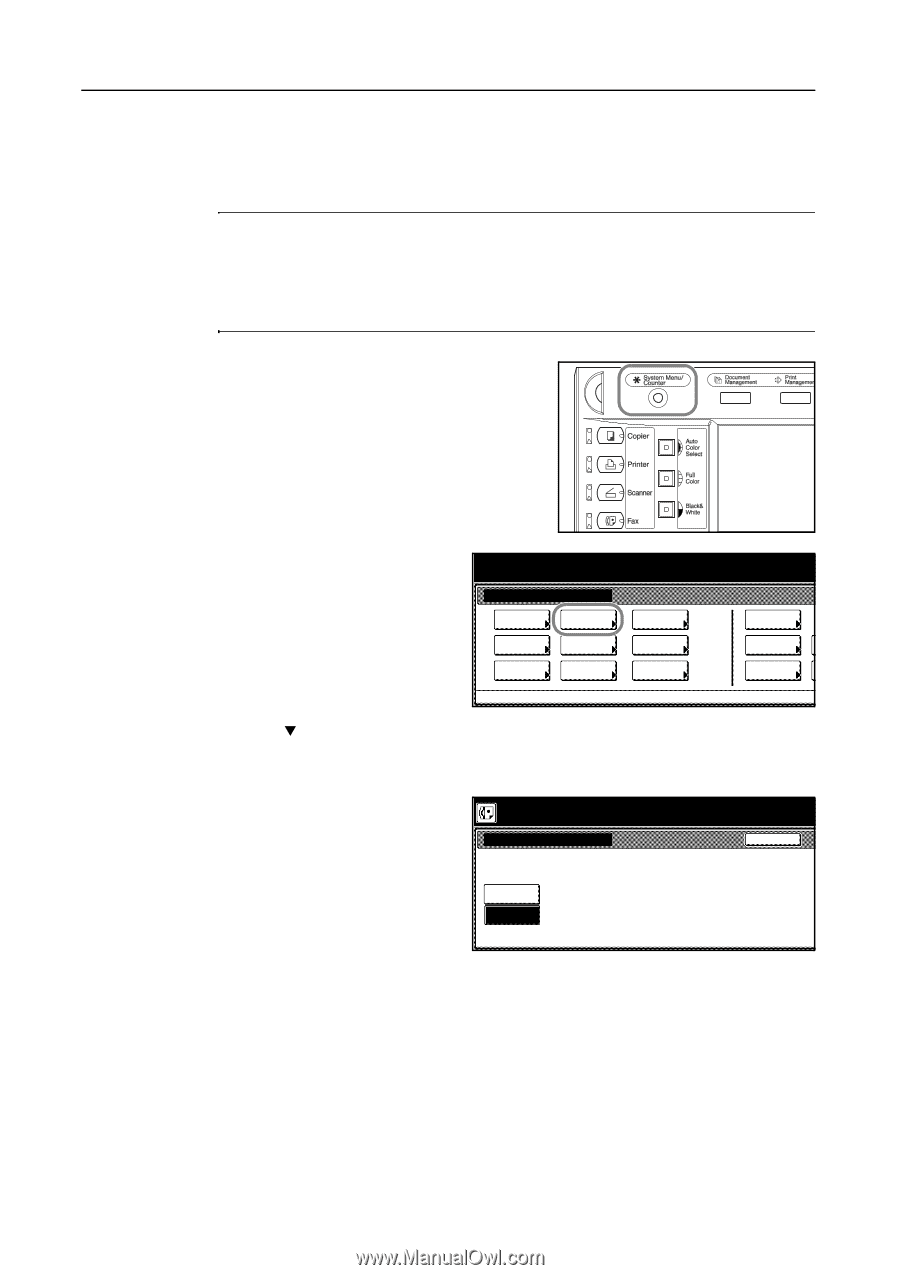
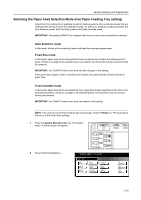
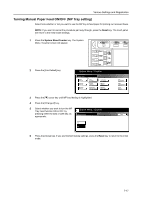
Various Settings and Registration Turning Remote Diagnosis ON/OFF (Remote Diagnosis setting) Especially if trouble occurs in this fax in which it is necessary to call for service, it is possible for our service center computer to access the fax directly over the telephone line and check its status and other information about the trouble. NOTE: To use Remote Diagnosis, it is necessary to enter into a contract with an authorized service center in advance and also to register a predetermined Remote Test ID in advance. (Refer to Registering the Remote Test ID (Remote Test ID setting) on page 7-21.) For further information, contact your service representative, an authorized service center or the place of purchase. If you want to cancel the procedure part way through, press the Reset key. The touch panel will return to the initial mode settings. 1 Press the System Menu/Counter key. The System Menu / Counter screen will appear. 2 Press the [Fax Default] key. System Menu / Counter System Menu Copy Default Scanner Default Machine Default FAX Default Printer Default Document Management Language MP tray Setting Register Orig. Size 3 Press the [T] cursor key until Remote Diag. (Remote diagn.) is highlighted. 4 Press the [Change #] key. 5 Select whether you want to turn Remote Diagnosis ON or OFF by pressing either the [On] or [Off] key, as appropriate. System Menu / Counter Remote Diag. On Off Job Accounting BOX Management Print Report Back 6 Press the [Close] key. If you are finished making settings, press the Reset key to return to the initial mode. 7-20
-
 1
1 -
2
-
3
-
4
-
5
-
6
-
7
-
8
-
9
-
10
-
11
-
12
-
13
-
14
-
15
-
16
-
17
-
18
-
19
-
20
-
21
-
22
-
23
-
24
-
25
-
26
-
27
-
28
-
29
-
30
-
31
-
32
-
33
-
34
-
35
-
36
-
37
-
38
-
39
-
40
-
41
-
42
-
43
-
44
-
45
-
46
-
47
-
48
-
49
-
50
-
51
-
52
-
53
-
54
-
55
-
56
-
57
-
58
-
59
-
60
-
61
-
62
-
63
-
64
-
65
-
66
-
67
-
68
-
69
-
70
-
71
-
72
-
73
-
74
-
75
-
76
-
77
-
78
-
79
-
80
-
81
-
82
-
83
-
84
-
85
-
86
-
87
-
88
-
89
-
90
-
91
-
92
-
93
-
94
-
95
-
96
-
97
-
98
-
99
-
100
-
101
-
102
-
103
-
104
-
105
-
106
-
107
-
108
-
109
-
110
-
111
-
112
-
113
-
114
-
115
-
116
-
117
-
118
-
119
-
120
-
121
-
122
-
123
-
124
-
125
-
126
-
127
-
128
-
129
-
130
-
131
-
132
-
133
-
134
-
135
-
136
-
137
-
138
-
139
-
140
-
141
-
142
-
143
-
144
-
145
-
146
-
147
-
148
-
149
-
150
-
151
-
152
-
153
-
154
-
155
-
156
-
157
-
158
-
159
-
160
-
161
-
162
-
163
-
164
-
165
-
166
-
167
-
168
-
169
-
170
-
171
-
172
-
173
-
174
-
175
-
176
-
177
-
178
-
179
-
180
-
181
-
182
-
183
-
184
-
185
-
186
-
187
-
188
-
189
-
190
-
191
-
192
-
193
-
194
-
195
-
196
-
 197
197 -
 198
198 -
 199
199 -
 200
200 -
 201
201 -
 202
202 -
 203
203 -
 204
204 -
 205
205 -
 206
206 -
 207
207 -
208
-
209
-
210
-
211
-
212
-
213
-
214
-
215
-
216
-
217
-
218
-
219
-
220
-
221
-
222
-
223
-
224
-
225
-
226
-
227
-
228
-
229
-
230
-
231
-
232
-
233
-
234
-
235
-
236
-
237
-
238
-
239
-
240
-
241
-
242
 |
 |