Sanyo VCC-HD5400 VCC-HD5400 Manual - Page 100
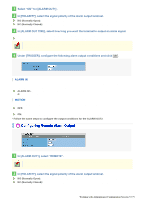
On the ALARM SETTINGS screen, in [MOTION], select ANALYTICS.
 |
UPC - 086483075698
View all Sanyo VCC-HD5400 manuals
Add to My Manuals
Save this manual to your list of manuals |
Page 100 highlights
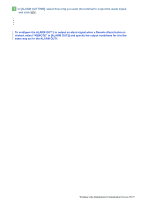
1 On the ALARM SETTINGS screen, in [MOTION], select "ANALYTICS". 2 In [DURATION], select how long you want the alarm state to be retained when the motion sensor detects motion and click DETAIL . The ANALYTICS screen appears. 5SEC, 10SEC, 15SEC, 20SEC, 30SEC, 45SEC, 1MIN, 2MIN, 3MIN, 4MIN, 5MIN CC (Retains the alarm state as long as the motion alarm persists.) The terminal will not accept subsequent alarm signals until the set duration expires. The alarm state will be retained for at least 5 seconds even if the motion is instantaneous. The configured duration value will be reset to the factory default value if you change any setting on the ALARM SETTINGS screen while an alarm state is retained. To switch the alarm detection method, in [MOTION ALARM], click the desired radio button. 3 Selects numbers for the stream and the preset position you want to detect. You can select a preset position from 1 to 8. The pull-down menu shows a list of streams for which you selected "H.264" in [CODEC] on the VIDEO & AUDIO SETTINGS screen. A warning message will appear if there is no H.264 stream available. 4 Select the radio button to specify whether to set detection lines or areas and configure the detection conditions. When finished, click SET and then BACK . You need to use the radio buttons for configuration; however, you can view the set detection lines and areas altogether. 1 Setting detection lines Select the radio button next to [LINE] and drag the mouse to draw detection lines. Working with Administrator Configuration Screens 54/79
-
 1
1 -
2
-
3
-
4
-
5
-
6
-
7
-
8
-
9
-
10
-
11
-
12
-
13
-
14
-
15
-
16
-
17
-
18
-
19
-
20
-
21
-
22
-
23
-
24
-
25
-
26
-
27
-
28
-
29
-
30
-
31
-
32
-
33
-
34
-
35
-
36
-
37
-
38
-
39
-
40
-
41
-
42
-
43
-
44
-
45
-
46
-
47
-
48
-
49
-
50
-
51
-
52
-
53
-
54
-
55
-
56
-
57
-
58
-
59
-
60
-
61
-
62
-
63
-
64
-
65
-
66
-
67
-
68
-
69
-
70
-
71
-
72
-
73
-
74
-
75
-
76
-
77
-
78
-
79
-
80
-
81
-
82
-
83
-
84
-
85
-
86
-
87
-
88
-
89
-
90
-
91
-
92
-
93
-
94
-
 95
95 -
 96
96 -
 97
97 -
 98
98 -
 99
99 -
 100
100 -
 101
101 -
 102
102 -
 103
103 -
 104
104 -
 105
105 -
106
-
107
-
108
-
109
-
110
-
111
-
112
-
113
-
114
-
115
-
116
-
117
-
118
-
119
-
120
-
121
-
122
-
123
-
124
-
125
-
126
-
127
-
128
-
129
-
130
-
131
-
132
-
133
-
134
-
135
-
136
-
137
-
138
-
139
-
140
-
141
-
142
-
143
-
144
-
145
 |
 |
