Sanyo VCC-HD5400 VCC-HD5400 Manual - Page 17
Configue the network information on your PC - ip camera
 |
UPC - 086483075698
View all Sanyo VCC-HD5400 manuals
Add to My Manuals
Save this manual to your list of manuals |
Page 17 highlights
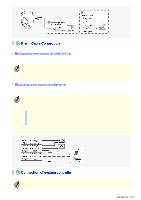
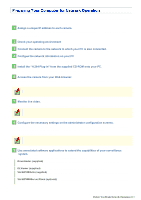
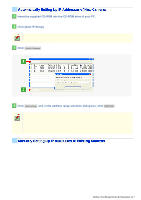
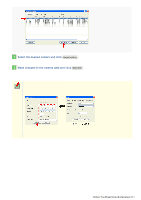
Follow the steps below to prepare your computer for network operation. For detailed procedure, refer to the linked information. 1 Assign a unique IP address to each camera. If you have newly installed two or more cameras on your network, you can accomplish this by using the supplied "Auto IP Setup" software. 2 Check your operating environment 3 Connect the camera to the network to which your PC is also connected. 4 Configue the network information on your PC You need to configure information such as the IP address of your PC. 5 Install the "H.264 Plug-in" from the supplied CD-ROM onto your PC. You are now ready to monitor the surveillance video in the H.264 format. 6 Access the camera from your Web browser. From your Web browser (Internet Explorer), access the camera and log into the system as an "admin" user (administrator). When you log in, you can select the display language on the network operation screens. 7 Monitor live video. When you access the camera and log into the system, live video from the camera appears on the live screen. If the live screen displays no or distorted video, check your operating environment and connection conditions. 8 Configure the necessary settings on the administrator configuration screens. Although the camera is already configured with the factory default settings so that you can monitor live video immediately after you log into the system, you need to configure necessary settings according to your installation environment and application of the camera. If this is the first access to the camera, start by configuring the system clock on the CLOCK SETTINGS screen. 9 Use associated software applications to extend the capabilities of your surveillance system. Install the following associated software applications on your PC, as required: Downloader (supplied): Downloader application for downloading video data recorded with the camera to your PC. DLViewer (supplied): Player application for playing back downloaded video data. VA-SW3050Lite (supplied): Monitor application for monitoring video images from more than one camera simultaneously on a multi-view screen. VA-SW3050Server/Client (optional): Recorder/player application for recording and playing back streaming video data from the network. Before You Begin Network Operation 2/13
-
 1
1 -
2
-
3
-
4
-
5
-
6
-
7
-
8
-
9
-
10
-
11
-
 12
12 -
 13
13 -
 14
14 -
 15
15 -
 16
16 -
 17
17 -
 18
18 -
 19
19 -
 20
20 -
 21
21 -
 22
22 -
23
-
24
-
25
-
26
-
27
-
28
-
29
-
30
-
31
-
32
-
33
-
34
-
35
-
36
-
37
-
38
-
39
-
40
-
41
-
42
-
43
-
44
-
45
-
46
-
47
-
48
-
49
-
50
-
51
-
52
-
53
-
54
-
55
-
56
-
57
-
58
-
59
-
60
-
61
-
62
-
63
-
64
-
65
-
66
-
67
-
68
-
69
-
70
-
71
-
72
-
73
-
74
-
75
-
76
-
77
-
78
-
79
-
80
-
81
-
82
-
83
-
84
-
85
-
86
-
87
-
88
-
89
-
90
-
91
-
92
-
93
-
94
-
95
-
96
-
97
-
98
-
99
-
100
-
101
-
102
-
103
-
104
-
105
-
106
-
107
-
108
-
109
-
110
-
111
-
112
-
113
-
114
-
115
-
116
-
117
-
118
-
119
-
120
-
121
-
122
-
123
-
124
-
125
-
126
-
127
-
128
-
129
-
130
-
131
-
132
-
133
-
134
-
135
-
136
-
137
-
138
-
139
-
140
-
141
-
142
-
143
-
144
-
145
 |
 |
