Sanyo VCC-HD5400 VCC-HD5400 Manual - Page 68
Configuring Monitoring Conditions, Switching between Monitoring Conditions
 |
UPC - 086483075698
View all Sanyo VCC-HD5400 manuals
Add to My Manuals
Save this manual to your list of manuals |
Page 68 highlights
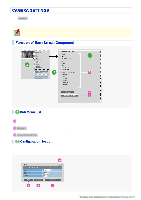
Configuring Monitoring Conditions In [VIEW], select any from among "CAM1" through "CAM8" and then configure the monitoring conditions by clicking each menu item in the sub menu. Switching between Monitoring Conditions In this screen select any from among "CAM1" through "CAM8". The monitoring conditions configured for the selected view setting are now applied to the camera. On the [PRESET POSITION SETTINGS] screen, you can configure the monitoring conditions (camera views) for each preset position. Configure the lens iris according to the luminance level of the target object. AUTO: Selects the auto iris mode. MANUAL: Selects the manual iris mode. The configured settings are applied only to the camera views that were specified in [VIEW]. Configuring these settings enables the camera to automatically adjust the lens iris to reproduce natural images even in outdoors where the luminance difference is significant, or under backlight conditions. 1 In [IRIS], select "AUTO". 2 In [SENSE UP], select the electronic sensitivity boosting power. OFF, x2, x4, x8, x16, x32 Working with Administrator Configuration Screens 22/79
-
 1
1 -
2
-
3
-
4
-
5
-
6
-
7
-
8
-
9
-
10
-
11
-
12
-
13
-
14
-
15
-
16
-
17
-
18
-
19
-
20
-
21
-
22
-
23
-
24
-
25
-
26
-
27
-
28
-
29
-
30
-
31
-
32
-
33
-
34
-
35
-
36
-
37
-
38
-
39
-
40
-
41
-
42
-
43
-
44
-
45
-
46
-
47
-
48
-
49
-
50
-
51
-
52
-
53
-
54
-
55
-
56
-
57
-
58
-
59
-
60
-
61
-
62
-
 63
63 -
 64
64 -
 65
65 -
 66
66 -
 67
67 -
 68
68 -
 69
69 -
 70
70 -
 71
71 -
 72
72 -
 73
73 -
74
-
75
-
76
-
77
-
78
-
79
-
80
-
81
-
82
-
83
-
84
-
85
-
86
-
87
-
88
-
89
-
90
-
91
-
92
-
93
-
94
-
95
-
96
-
97
-
98
-
99
-
100
-
101
-
102
-
103
-
104
-
105
-
106
-
107
-
108
-
109
-
110
-
111
-
112
-
113
-
114
-
115
-
116
-
117
-
118
-
119
-
120
-
121
-
122
-
123
-
124
-
125
-
126
-
127
-
128
-
129
-
130
-
131
-
132
-
133
-
134
-
135
-
136
-
137
-
138
-
139
-
140
-
141
-
142
-
143
-
144
-
145
 |
 |
