Sanyo VCC-HD5400 VCC-HD5400 Manual - Page 54
In [TITLE], type the desired camera title and click
 |
UPC - 086483075698
View all Sanyo VCC-HD5400 manuals
Add to My Manuals
Save this manual to your list of manuals |
Page 54 highlights
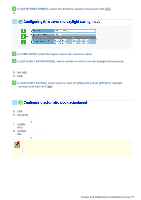
Click CLOCK in the configuration menu to display the CLOCK SETTINGS screen. Before you start network operation, you need to configure the clock settings on this screen. A Configuring camera title B Configuring clock date/time and display style C Configuring time zone and daylight saving mode D Configuring automatic clock adjustment Required operation privilege: admin, operator1 Configure the camera title that will be displayed on the live screen and in e-mails, image files, and so on. In [TITLE], type the desired camera title and click SET . You can type up to 16 alphanumeric characters. The setting is saved and the camera title appears on the live screen. Note that the camera title cannot include the following symbols: double quote ("), single quote ('), ampersand (&), greater-than sign (), vertical bar (|), and semicolon (;). A warning dialog box will appear when you click SET if the camera title includes any invalid character. 1 In [CLOCK SET], configure the current date and time in [DATE] and [TIME], respectively. The configured date and time settings will be reflected on the camera's built-in clock. The day of the week is automatically set based on the date and time settings. 2 In [CLOCK DISPLAY], select the clock display style. 1 12/24 (Clock type): 12HRS (12-hour clock), 24HRS (24-hour clock) 2 SIZE (Character size): SMALL, MEDIUM, LARGE 3 POSITION (Display position): UP LEFT, UP RIGHT, DOWN LEFT, DOWN RIGHT, OFF (Hidden) Working with Administrator Configuration Screens 8/79
-
 1
1 -
2
-
3
-
4
-
5
-
6
-
7
-
8
-
9
-
10
-
11
-
12
-
13
-
14
-
15
-
16
-
17
-
18
-
19
-
20
-
21
-
22
-
23
-
24
-
25
-
26
-
27
-
28
-
29
-
30
-
31
-
32
-
33
-
34
-
35
-
36
-
37
-
38
-
39
-
40
-
41
-
42
-
43
-
44
-
45
-
46
-
47
-
48
-
 49
49 -
 50
50 -
 51
51 -
 52
52 -
 53
53 -
 54
54 -
 55
55 -
 56
56 -
 57
57 -
 58
58 -
 59
59 -
60
-
61
-
62
-
63
-
64
-
65
-
66
-
67
-
68
-
69
-
70
-
71
-
72
-
73
-
74
-
75
-
76
-
77
-
78
-
79
-
80
-
81
-
82
-
83
-
84
-
85
-
86
-
87
-
88
-
89
-
90
-
91
-
92
-
93
-
94
-
95
-
96
-
97
-
98
-
99
-
100
-
101
-
102
-
103
-
104
-
105
-
106
-
107
-
108
-
109
-
110
-
111
-
112
-
113
-
114
-
115
-
116
-
117
-
118
-
119
-
120
-
121
-
122
-
123
-
124
-
125
-
126
-
127
-
128
-
129
-
130
-
131
-
132
-
133
-
134
-
135
-
136
-
137
-
138
-
139
-
140
-
141
-
142
-
143
-
144
-
145
 |
 |
