Sanyo VCC-HD5400 VCC-HD5400 Manual - Page 74
Bottom, Left, And Right.
 |
UPC - 086483075698
View all Sanyo VCC-HD5400 manuals
Add to My Manuals
Save this manual to your list of manuals |
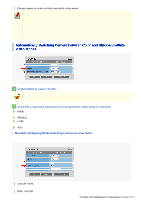
Page 74 highlights
4 Configure the metering weight values for the four surrounding metering areas (TOP, BOTTOM, LEFT, and RIGHT). Select a weight value for each of these metering areas depending on the installation environment. 0 (minimum) to 7 (maximum) The weight value for the center metering area ([CENTER]) is fixed to "7". You cannot change this value. The brightness value represents the weight for each area and therefore does not affect the actual live video image from the camera. 5 Click SET and then BACK . The settings are saved and you return to the sub menu. You can use light source masking to compensate for backlighting problems with human or other objects in the subject, by masking the light source in a bright background. 1 In [BLC], select "MASKING" and click SET . The BLC masking screen appears. 2 Drag the mouse over the live video image to select the area you want to mask. The masked area is indicated by blue-bordered grid cells each containing the letter "M". You can mask more than one portion of the live image. Working with Administrator Configuration Screens 28/79
-
 1
1 -
2
-
3
-
4
-
5
-
6
-
7
-
8
-
9
-
10
-
11
-
12
-
13
-
14
-
15
-
16
-
17
-
18
-
19
-
20
-
21
-
22
-
23
-
24
-
25
-
26
-
27
-
28
-
29
-
30
-
31
-
32
-
33
-
34
-
35
-
36
-
37
-
38
-
39
-
40
-
41
-
42
-
43
-
44
-
45
-
46
-
47
-
48
-
49
-
50
-
51
-
52
-
53
-
54
-
55
-
56
-
57
-
58
-
59
-
60
-
61
-
62
-
63
-
64
-
65
-
66
-
67
-
68
-
 69
69 -
 70
70 -
 71
71 -
 72
72 -
 73
73 -
 74
74 -
 75
75 -
 76
76 -
 77
77 -
 78
78 -
 79
79 -
80
-
81
-
82
-
83
-
84
-
85
-
86
-
87
-
88
-
89
-
90
-
91
-
92
-
93
-
94
-
95
-
96
-
97
-
98
-
99
-
100
-
101
-
102
-
103
-
104
-
105
-
106
-
107
-
108
-
109
-
110
-
111
-
112
-
113
-
114
-
115
-
116
-
117
-
118
-
119
-
120
-
121
-
122
-
123
-
124
-
125
-
126
-
127
-
128
-
129
-
130
-
131
-
132
-
133
-
134
-
135
-
136
-
137
-
138
-
139
-
140
-
141
-
142
-
143
-
144
-
145
 |
 |
