Sanyo VCC-HD5400 VCC-HD5400 Manual - Page 56
In [CLOCK ADJUST], select ALARM IN1.
 |
UPC - 086483075698
View all Sanyo VCC-HD5400 manuals
Add to My Manuals
Save this manual to your list of manuals |
Page 56 highlights
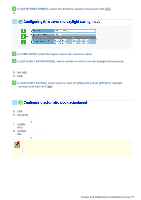
1 In [CLOCK ADJUST], select "ON (NTP)". 2 Configure the required settings shown below and click SET . 1 To automatically adjust the clock time every day, in [TIME TO SYNCHRONIZE], select the 24-hour time to which you want to adjust the clock (for example, "10:30"). 2 To adjust the clock to the current time, click REFRESH . 3 In [NTP SERVER ADDRESS], type the IP address or domain name of the NTP server from which you want to retrieve the date and time information. 4 In [LOG], the last entry of the operation log related to automatic clock adjustment is shown. When "ON (NTP)" in [CLOCK ADJUST] is selected, the clock adjustment function adjusts the clock in the following timings. When the camera is turned on At the time selected in [TIME TO SYNCHRONIZE] (every day) When any change is made to the settings on this screen To use a domain name, you must specify the DNS server address in [DNS SERVER ADDRESS] on the NETWORK SETTINGS screen. 1 In [CLOCK ADJUST], select "ALARM IN1". 2 In [CLOCK IN], select the 24-hour time to which you want to adjust the clock (for example, "22" for 10 p.m.) when the switch connected to the ALARM IN1 terminal turns on, and click SET . The clock time will not be adjusted if the difference between the set time and the current time exceeds the range of -29 to +30 minutes. Working with Administrator Configuration Screens 10/79
-
 1
1 -
2
-
3
-
4
-
5
-
6
-
7
-
8
-
9
-
10
-
11
-
12
-
13
-
14
-
15
-
16
-
17
-
18
-
19
-
20
-
21
-
22
-
23
-
24
-
25
-
26
-
27
-
28
-
29
-
30
-
31
-
32
-
33
-
34
-
35
-
36
-
37
-
38
-
39
-
40
-
41
-
42
-
43
-
44
-
45
-
46
-
47
-
48
-
49
-
50
-
 51
51 -
 52
52 -
 53
53 -
 54
54 -
 55
55 -
 56
56 -
 57
57 -
 58
58 -
 59
59 -
 60
60 -
 61
61 -
62
-
63
-
64
-
65
-
66
-
67
-
68
-
69
-
70
-
71
-
72
-
73
-
74
-
75
-
76
-
77
-
78
-
79
-
80
-
81
-
82
-
83
-
84
-
85
-
86
-
87
-
88
-
89
-
90
-
91
-
92
-
93
-
94
-
95
-
96
-
97
-
98
-
99
-
100
-
101
-
102
-
103
-
104
-
105
-
106
-
107
-
108
-
109
-
110
-
111
-
112
-
113
-
114
-
115
-
116
-
117
-
118
-
119
-
120
-
121
-
122
-
123
-
124
-
125
-
126
-
127
-
128
-
129
-
130
-
131
-
132
-
133
-
134
-
135
-
136
-
137
-
138
-
139
-
140
-
141
-
142
-
143
-
144
-
145
 |
 |
