Sanyo VCC-HD5400 VCC-HD5400 Manual - Page 60
of the displayed image.
 |
UPC - 086483075698
View all Sanyo VCC-HD5400 manuals
Add to My Manuals
Save this manual to your list of manuals |
Page 60 highlights
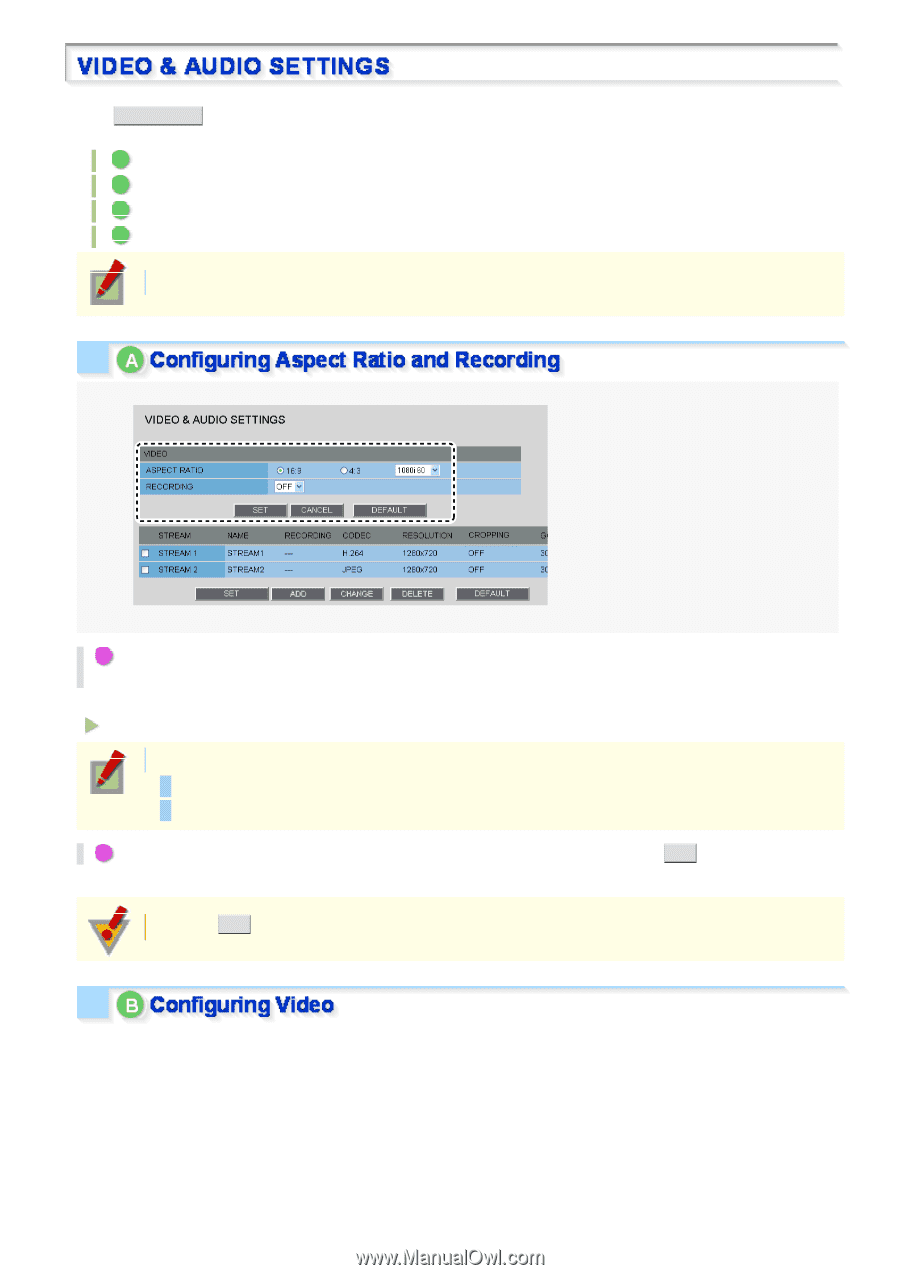
Click VIDEO/AUDIO in the configuration menu to display the VIDEO & AUDIO SETTINGS screen. On this screen, configure the conditions of each video stream and the audio you receive from the camera. A Configuring Aspect Ratio and Recording B Configuring Video C Configuring the audio D Configuring TV output Required operation privilege: admin, operator1 1 Click a radio button under [ASPECT RATIO] to select the aspect ratio (width-to-height ratio) of the displayed image. This setting applies to all video/image streams you are configuring. 16:9 (Landscape), 4:3 (Portrait) Configuring input mode: If "16:9" is selected, you can choose either "1080i 60" or "1080i 30". If "4:3" is selected, "1200p 30" is set automatically. 2 To record a video stream, configure [RECORDING] to "ON" and click SET . If you configure to "OFF", you can only view the video streams and cannot record them. Clicking SET reboots the camera. This camera supports multi-stream video transmission, allowing you to register up to four video/image streaming condition patterns. Thus, you can reduce the load of the entire system by choosing optimal settings for your application, such as recording or live video monitoring. Working with Administrator Configuration Screens 14/79
-
 1
1 -
2
-
3
-
4
-
5
-
6
-
7
-
8
-
9
-
10
-
11
-
12
-
13
-
14
-
15
-
16
-
17
-
18
-
19
-
20
-
21
-
22
-
23
-
24
-
25
-
26
-
27
-
28
-
29
-
30
-
31
-
32
-
33
-
34
-
35
-
36
-
37
-
38
-
39
-
40
-
41
-
42
-
43
-
44
-
45
-
46
-
47
-
48
-
49
-
50
-
51
-
52
-
53
-
54
-
 55
55 -
 56
56 -
 57
57 -
 58
58 -
 59
59 -
 60
60 -
 61
61 -
 62
62 -
 63
63 -
 64
64 -
 65
65 -
66
-
67
-
68
-
69
-
70
-
71
-
72
-
73
-
74
-
75
-
76
-
77
-
78
-
79
-
80
-
81
-
82
-
83
-
84
-
85
-
86
-
87
-
88
-
89
-
90
-
91
-
92
-
93
-
94
-
95
-
96
-
97
-
98
-
99
-
100
-
101
-
102
-
103
-
104
-
105
-
106
-
107
-
108
-
109
-
110
-
111
-
112
-
113
-
114
-
115
-
116
-
117
-
118
-
119
-
120
-
121
-
122
-
123
-
124
-
125
-
126
-
127
-
128
-
129
-
130
-
131
-
132
-
133
-
134
-
135
-
136
-
137
-
138
-
139
-
140
-
141
-
142
-
143
-
144
-
145
 |
 |