Sanyo VCC-HD5400 VCC-HD5400 Manual - Page 48
In [IP ADDRESS], select FIX and type the IP address of the camera below it.
 |
UPC - 086483075698
View all Sanyo VCC-HD5400 manuals
Add to My Manuals
Save this manual to your list of manuals |
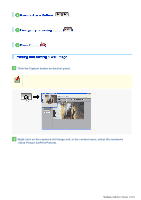
Page 48 highlights
Click NETWORK in the configuration menu to display the NETWORK SETTINGS screen. On this screen, configure the following settings as required. A Configuring basic network settings (NETWORK) B Configuring DDNS setting (DDNS) C Configuring HTTP settings D Configuring RTSP/RTP settings E Configuring access name settings (ACCESS NAME) F Multicast settings (MULTICAST) Required operation privilege: admin Before attempting to configure these network settings, contact your network administrator. Configure the environment required to connect to the camera via the network by specifying the IP address, subnet mask, and other information. 1 In [IP ADDRESS], select "FIX" and type the IP address of the camera below it. 2 In [SUBNET MASK] and [GATEWAY], type your subnet mask and gateway addresses, respectively. 3 In [DNS (PRIMARY)] and [DNS (SECONDARY)], type your primary and secondary DNS server addresses and click SET . Because you selected "FIX" in [IP ADDRESS], you specify here fixed DNS server addresses. After completing the above steps, click the Close button to once disconnect and then reconnect to the camera to apply the changes. To redo the procedure from the beginning, before clicking SET , click CANCEL . To restore the factory default settings, click DEFAULT . In [MAC ADDRESS], the MAC address of the camera is shown. You cannot change this address. Working with Administrator Configuration Screens 2/79
-
 1
1 -
2
-
3
-
4
-
5
-
6
-
7
-
8
-
9
-
10
-
11
-
12
-
13
-
14
-
15
-
16
-
17
-
18
-
19
-
20
-
21
-
22
-
23
-
24
-
25
-
26
-
27
-
28
-
29
-
30
-
31
-
32
-
33
-
34
-
35
-
36
-
37
-
38
-
39
-
40
-
41
-
42
-
 43
43 -
 44
44 -
 45
45 -
 46
46 -
 47
47 -
 48
48 -
 49
49 -
 50
50 -
 51
51 -
 52
52 -
 53
53 -
54
-
55
-
56
-
57
-
58
-
59
-
60
-
61
-
62
-
63
-
64
-
65
-
66
-
67
-
68
-
69
-
70
-
71
-
72
-
73
-
74
-
75
-
76
-
77
-
78
-
79
-
80
-
81
-
82
-
83
-
84
-
85
-
86
-
87
-
88
-
89
-
90
-
91
-
92
-
93
-
94
-
95
-
96
-
97
-
98
-
99
-
100
-
101
-
102
-
103
-
104
-
105
-
106
-
107
-
108
-
109
-
110
-
111
-
112
-
113
-
114
-
115
-
116
-
117
-
118
-
119
-
120
-
121
-
122
-
123
-
124
-
125
-
126
-
127
-
128
-
129
-
130
-
131
-
132
-
133
-
134
-
135
-
136
-
137
-
138
-
139
-
140
-
141
-
142
-
143
-
144
-
145
 |
 |
