Sanyo VCC-HD5400 VCC-HD5400 Manual - Page 91
Perform the same steps to con preset positions for PRESET NUMBER.2 onwards.
 |
UPC - 086483075698
View all Sanyo VCC-HD5400 manuals
Add to My Manuals
Save this manual to your list of manuals |
Page 91 highlights
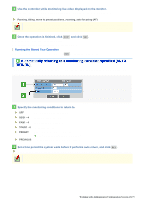
(Group 1) (Group 2) 4 Perform the same steps to configure preset positions for "PRESET NUMBER.2" onwards. You can save up to 255 preset positions. In [GROUP NUMBER], select a group number for batch assignment, and then click SET . The specified group number is assigned to up to 20 preset positions in the same page. You can specify up to 20 preset positions in a page. If you want to switch to another page, specify the range of preset position numbers in [PRESET NUMBER SELECT]. 1 - 20, 21 - 40, ... 241 - 255 (13 pages in total) Click DEFAULT , and then YES in the confirmation dialog box. Every setting such as the orientation of the camera lens will be returned to the factory default setting. Click SET in [AUTO MODE SETTINGS] on the PAN/TILT screen to display the AUTO MODE SETTINGS screen. On this screen, you can configure four automatic mode operations as follows: A Moving in a sequential manner among multiple preset positions (SEQUENCE). B Reciprocating between two preset positions specified (AUTO PAN). C Repeating a registered continuous operation pattern (TOUR). D Automatically returning to a monitoring condition specified (AUTO RETURN). The camera moves on to the next preset position one after another among those saved in the same sequence group. Four patterns of sequence operation are available as shown below. Working with Administrator Configuration Screens 45/79
-
 1
1 -
2
-
3
-
4
-
5
-
6
-
7
-
8
-
9
-
10
-
11
-
12
-
13
-
14
-
15
-
16
-
17
-
18
-
19
-
20
-
21
-
22
-
23
-
24
-
25
-
26
-
27
-
28
-
29
-
30
-
31
-
32
-
33
-
34
-
35
-
36
-
37
-
38
-
39
-
40
-
41
-
42
-
43
-
44
-
45
-
46
-
47
-
48
-
49
-
50
-
51
-
52
-
53
-
54
-
55
-
56
-
57
-
58
-
59
-
60
-
61
-
62
-
63
-
64
-
65
-
66
-
67
-
68
-
69
-
70
-
71
-
72
-
73
-
74
-
75
-
76
-
77
-
78
-
79
-
80
-
81
-
82
-
83
-
84
-
85
-
 86
86 -
 87
87 -
 88
88 -
 89
89 -
 90
90 -
 91
91 -
 92
92 -
 93
93 -
 94
94 -
 95
95 -
 96
96 -
97
-
98
-
99
-
100
-
101
-
102
-
103
-
104
-
105
-
106
-
107
-
108
-
109
-
110
-
111
-
112
-
113
-
114
-
115
-
116
-
117
-
118
-
119
-
120
-
121
-
122
-
123
-
124
-
125
-
126
-
127
-
128
-
129
-
130
-
131
-
132
-
133
-
134
-
135
-
136
-
137
-
138
-
139
-
140
-
141
-
142
-
143
-
144
-
145
 |
 |
