Sanyo VCC-HD5400 VCC-HD5400 Manual - Page 85
Use the controller to adjust the orientation of the camera lens while monitoring live video
 |
UPC - 086483075698
View all Sanyo VCC-HD5400 manuals
Add to My Manuals
Save this manual to your list of manuals |
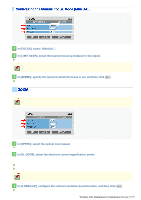
Page 85 highlights
The configured settings are applied in common to all the camera views. 1 Click [PRIVACY MASK] in the sub menu. The PRIVACY MASK SETTINGS screen appears. 2 Click PTZ to view the PTZ controller. 3 Use the controller to adjust the orientation of the camera lens while monitoring live video displayed on the monitor. 4 Click the mask number button you want to configure. The selected button is displayed in orange. 5 Drag the mouse over the screen to specify the masking area, and click SET . The mask pattern is placed over the specified area. While changing the orientation of the camera lens, you can set up to 32 mask patterns to anywhere in the whole monitored area (up to 8 spots at the WIDE end). Moving, resizing, and deleting mask pattern: Click a mask number button, perform the desired operation (move, resize, or delete), and then click SET . Move: Select the mask pattern and drag it using the mouse. Resize: Place the cursor over the border of the mask pattern and drag using the mouse. Delete: Click DELETE ( 1 ) Working with Administrator Configuration Screens 39/79
-
 1
1 -
2
-
3
-
4
-
5
-
6
-
7
-
8
-
9
-
10
-
11
-
12
-
13
-
14
-
15
-
16
-
17
-
18
-
19
-
20
-
21
-
22
-
23
-
24
-
25
-
26
-
27
-
28
-
29
-
30
-
31
-
32
-
33
-
34
-
35
-
36
-
37
-
38
-
39
-
40
-
41
-
42
-
43
-
44
-
45
-
46
-
47
-
48
-
49
-
50
-
51
-
52
-
53
-
54
-
55
-
56
-
57
-
58
-
59
-
60
-
61
-
62
-
63
-
64
-
65
-
66
-
67
-
68
-
69
-
70
-
71
-
72
-
73
-
74
-
75
-
76
-
77
-
78
-
79
-
 80
80 -
 81
81 -
 82
82 -
 83
83 -
 84
84 -
 85
85 -
 86
86 -
 87
87 -
 88
88 -
 89
89 -
 90
90 -
91
-
92
-
93
-
94
-
95
-
96
-
97
-
98
-
99
-
100
-
101
-
102
-
103
-
104
-
105
-
106
-
107
-
108
-
109
-
110
-
111
-
112
-
113
-
114
-
115
-
116
-
117
-
118
-
119
-
120
-
121
-
122
-
123
-
124
-
125
-
126
-
127
-
128
-
129
-
130
-
131
-
132
-
133
-
134
-
135
-
136
-
137
-
138
-
139
-
140
-
141
-
142
-
143
-
144
-
145
 |
 |
