Sanyo VCC-HD5400 VCC-HD5400 Manual - Page 95
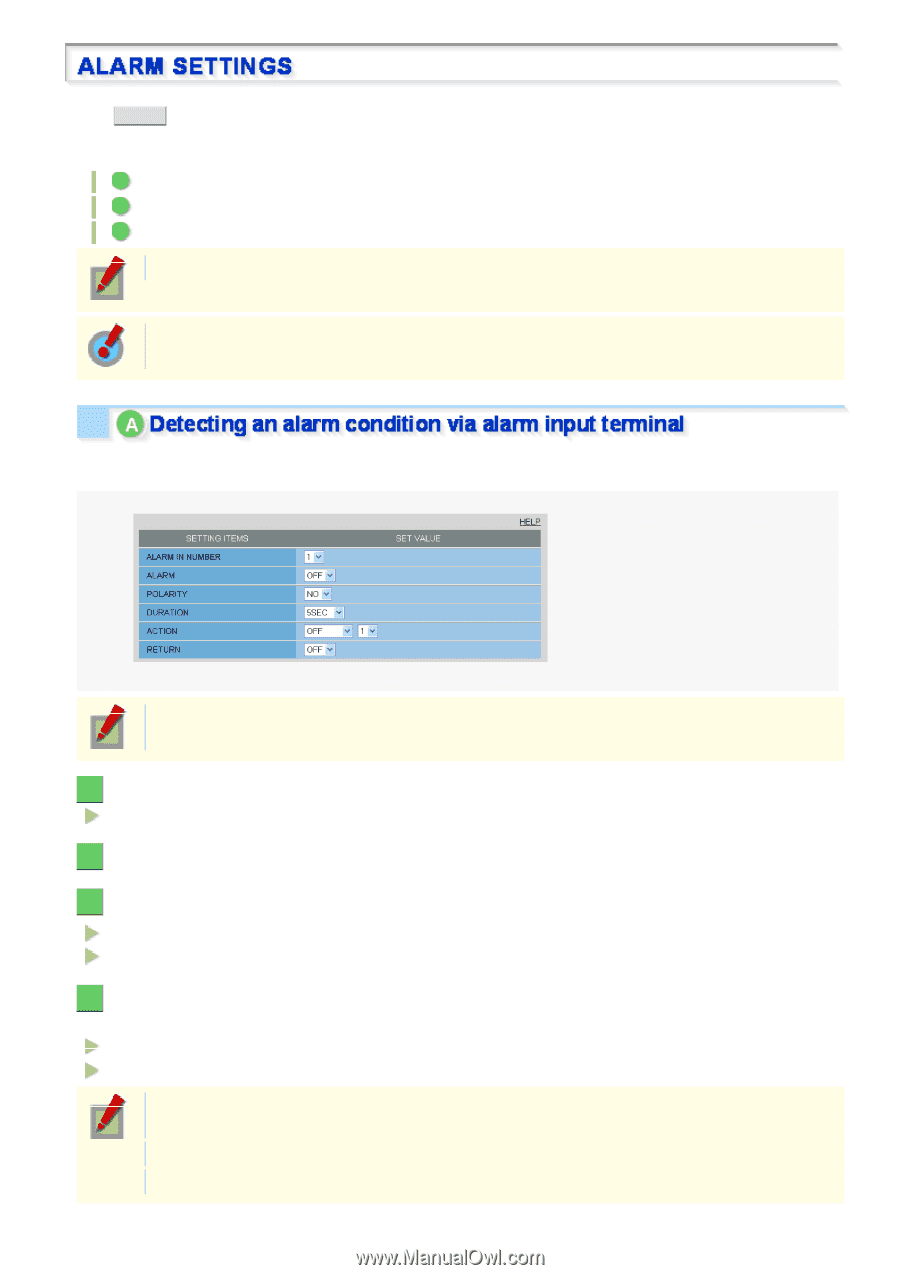
Select 1 for the ALARM IN number ALARM IN NUMBER.
 |
UPC - 086483075698
View all Sanyo VCC-HD5400 manuals
Add to My Manuals
Save this manual to your list of manuals |
Page 95 highlights
Click ALARM in the configuration menu to display the ALARM SETTINGS screen. If you want the camera to record surveillance video or transmit a warning signal by detecting an alarm condition, configure the following settings on this screen. A Detecting an alarm condition via alarm input terminal B Detecting an alarm condition via built-in motion sensor C Outputting an alarm signal from alarm output terminal Required operation privilege: admin, operator1 To record video by detecting an alarm condition, after completing the configuration on this screen, you must select an alarm event in [ALARM EVENT] on the RECORDING screen. Configure the input condition of the camera alarm input cable and the corresponding behavior for each alarm input number. To configure this function, connect an alarm input cable for the camera. For details, refer to the "Alarm Cable Connection" section. 1 Select "1" for the ALARM IN number (ALARM IN NUMBER). 1 - 4 2 Enable the settings (select ON) (ALARM). 3 In [POLARITY], select the signal polarity of the alarm input terminal. NO (Normally Open): The terminal is normally open and closes when an alarm signal is received. NC (Normally Closed): The terminal is normally closed and opens when an alarm signal is received. 4 Select how long you want an alarm to last during alarm input (DURATION). The terminal will not accept subsequent alarm signals until the set duration expires. 5SEC, 10SEC, 15SEC, 20SEC, 30SEC, 45SEC, 1MIN, 2MIN, 3MIN, 4MIN, 5MIN CC (Retains the alarm state as long as the alarm signal persists.) If an alarm condition is detected, alarm recording will last until the time specified in [DURATION] expires. The alarm state will be retained for at least 5 seconds even if the alarm signal is instantaneous. When [RETURN] is set to "ON", you cannot select "CC". Working with Administrator Configuration Screens 49/79
-
 1
1 -
2
-
3
-
4
-
5
-
6
-
7
-
8
-
9
-
10
-
11
-
12
-
13
-
14
-
15
-
16
-
17
-
18
-
19
-
20
-
21
-
22
-
23
-
24
-
25
-
26
-
27
-
28
-
29
-
30
-
31
-
32
-
33
-
34
-
35
-
36
-
37
-
38
-
39
-
40
-
41
-
42
-
43
-
44
-
45
-
46
-
47
-
48
-
49
-
50
-
51
-
52
-
53
-
54
-
55
-
56
-
57
-
58
-
59
-
60
-
61
-
62
-
63
-
64
-
65
-
66
-
67
-
68
-
69
-
70
-
71
-
72
-
73
-
74
-
75
-
76
-
77
-
78
-
79
-
80
-
81
-
82
-
83
-
84
-
85
-
86
-
87
-
88
-
89
-
 90
90 -
 91
91 -
 92
92 -
 93
93 -
 94
94 -
 95
95 -
 96
96 -
 97
97 -
 98
98 -
 99
99 -
 100
100 -
101
-
102
-
103
-
104
-
105
-
106
-
107
-
108
-
109
-
110
-
111
-
112
-
113
-
114
-
115
-
116
-
117
-
118
-
119
-
120
-
121
-
122
-
123
-
124
-
125
-
126
-
127
-
128
-
129
-
130
-
131
-
132
-
133
-
134
-
135
-
136
-
137
-
138
-
139
-
140
-
141
-
142
-
143
-
144
-
145
 |
 |