Sanyo VCC-HD5400 VCC-HD5400 Manual - Page 102
A TO B, B TO A, A TO B, B TO A, Configuring automatic, alarm output, Configuring remote alarm,
 |
UPC - 086483075698
View all Sanyo VCC-HD5400 manuals
Add to My Manuals
Save this manual to your list of manuals |
Page 102 highlights
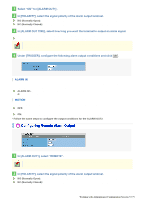
A TO B: Detects object movement from A to B. B TO A: Detects object movement from B to A. A TO B, B TO A: Detects object movement between A and B, in both directions. (Ex. Appearance of detection line) (Ex. Appearance of detection area) * For the size and direction of the object to be detected when you selected [AREA], refer to the above figure on the right. 4 In [SENSITIVITY], select the detection sensitivity. You can adjust the detection sensitivity to prevent unwanted detection. The higher the value, the lower the sensitivity. 1 (HIGH) to 9 (LOW) 5 Click TEST to check how the motion sensor works with the current settings. If any motion is detected with respect to the detection line (or detection area), that line will be shown in red. Correct the detection conditions as required. While the sensor is working, this button is labeled as END . To finish checking the motion sensor, click the button. During the test, you cannot change line/area settings. Configure the output conditions of alarm output terminals for each alarm output number. A Configuring automatic alarm output: Configure the terminal so that it outputs an alarm signal automatically when an alarm condition is detected. B Configuring remote alarm Configure the terminal so that it outputs an alarm signal when the output: corresponding Remote Alarm button is clicked. If you configure this function, connect an alarm output cable for the camera. For details, refer to the "Alarm Cable Connection" section. Working with Administrator Configuration Screens 56/79
-
 1
1 -
2
-
3
-
4
-
5
-
6
-
7
-
8
-
9
-
10
-
11
-
12
-
13
-
14
-
15
-
16
-
17
-
18
-
19
-
20
-
21
-
22
-
23
-
24
-
25
-
26
-
27
-
28
-
29
-
30
-
31
-
32
-
33
-
34
-
35
-
36
-
37
-
38
-
39
-
40
-
41
-
42
-
43
-
44
-
45
-
46
-
47
-
48
-
49
-
50
-
51
-
52
-
53
-
54
-
55
-
56
-
57
-
58
-
59
-
60
-
61
-
62
-
63
-
64
-
65
-
66
-
67
-
68
-
69
-
70
-
71
-
72
-
73
-
74
-
75
-
76
-
77
-
78
-
79
-
80
-
81
-
82
-
83
-
84
-
85
-
86
-
87
-
88
-
89
-
90
-
91
-
92
-
93
-
94
-
95
-
96
-
 97
97 -
 98
98 -
 99
99 -
 100
100 -
 101
101 -
 102
102 -
 103
103 -
 104
104 -
 105
105 -
 106
106 -
 107
107 -
108
-
109
-
110
-
111
-
112
-
113
-
114
-
115
-
116
-
117
-
118
-
119
-
120
-
121
-
122
-
123
-
124
-
125
-
126
-
127
-
128
-
129
-
130
-
131
-
132
-
133
-
134
-
135
-
136
-
137
-
138
-
139
-
140
-
141
-
142
-
143
-
144
-
145
 |
 |
