Sanyo VCC-HD5400 VCC-HD5400 Manual - Page 9
Fall-prevention screw, SD Card Slot, Power indicator, SD CARD button - manual
 |
UPC - 086483075698
View all Sanyo VCC-HD5400 manuals
Add to My Manuals
Save this manual to your list of manuals |
Page 9 highlights
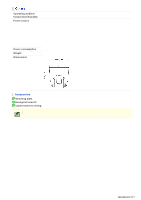
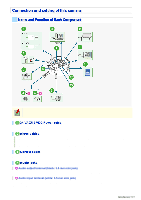
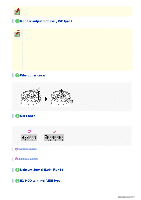
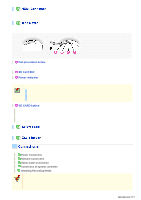
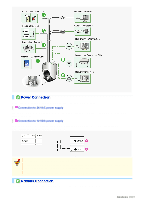
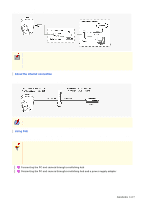
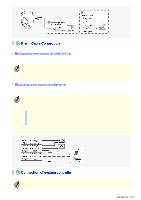
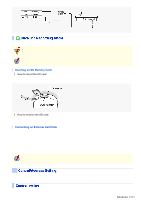
The terminal outputs super-fine HD (High Definition) video signal. Use the terminal to connect a high-definition monitor with HDMI interface. To record live video on a SD memory card, open the cover as shown below and insert the card into the card slot until you hear a click. A Fall-prevention screw Use this screw and the supplied hexagonal wrench to secure the installed camera. B SD Card Slot C Power indicator This indicator lights up when the camera is powered on. When the camera is on, this indicator blinks to indicate the following camera statuses: Deactivation of recording to SD memory card in progress Firmware update in progress An SD memory card error occurred (Fast blink) D SD CARD button Disable recording: The power indicator blinks when this button is pressed, and stays lit when the SD memory card is prepared to be removed. Enable recording: The power indicator blinks when this button is pressed, and stays lit when the SD memory card is recognized. Use this cable to hook the camera on the supplied mounting plate when installing the camera. Perform the following connections according to the installation environment and application of your camera. A Power Connection B Network Connection C Alarm Cable Connection D Connection of system controller E Installing Recording Media Before attempting the following connections, be sure to turn off all components of your system. Improper connection may cause smoke or failures. Before attempting to connect each system component, carefully read the instruction manual that comes with it to familiarize yourself with the correct connection procedure. Introduction 9/15
-
 1
1 -
2
-
3
-
 4
4 -
 5
5 -
 6
6 -
 7
7 -
 8
8 -
 9
9 -
 10
10 -
 11
11 -
 12
12 -
 13
13 -
 14
14 -
15
-
16
-
17
-
18
-
19
-
20
-
21
-
22
-
23
-
24
-
25
-
26
-
27
-
28
-
29
-
30
-
31
-
32
-
33
-
34
-
35
-
36
-
37
-
38
-
39
-
40
-
41
-
42
-
43
-
44
-
45
-
46
-
47
-
48
-
49
-
50
-
51
-
52
-
53
-
54
-
55
-
56
-
57
-
58
-
59
-
60
-
61
-
62
-
63
-
64
-
65
-
66
-
67
-
68
-
69
-
70
-
71
-
72
-
73
-
74
-
75
-
76
-
77
-
78
-
79
-
80
-
81
-
82
-
83
-
84
-
85
-
86
-
87
-
88
-
89
-
90
-
91
-
92
-
93
-
94
-
95
-
96
-
97
-
98
-
99
-
100
-
101
-
102
-
103
-
104
-
105
-
106
-
107
-
108
-
109
-
110
-
111
-
112
-
113
-
114
-
115
-
116
-
117
-
118
-
119
-
120
-
121
-
122
-
123
-
124
-
125
-
126
-
127
-
128
-
129
-
130
-
131
-
132
-
133
-
134
-
135
-
136
-
137
-
138
-
139
-
140
-
141
-
142
-
143
-
144
-
145
 |
 |
