Sanyo VCC-HD5400 VCC-HD5400 Manual - Page 64
To mute audio output during PTZ operation, set [MUTE PAN/TILT, ZOOM] to ON
 |
UPC - 086483075698
View all Sanyo VCC-HD5400 manuals
Add to My Manuals
Save this manual to your list of manuals |
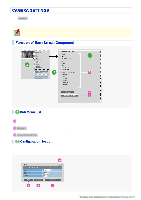
Page 64 highlights
1 Set [AUDIO] to "ON" in order to enable audio communication. 2 In [MIC SENSITIVITY], specify the microphone sensitivity. Select the sensitivity of the microphone connected to the camera from 8 levels. +4, +3, +2, +1, 0, -1, -2, -3 3 In [FILTER(500Hz)], enable or disable the audio filter. The audio filter reduces the 500 Hz or less frequency components of the audio. A filter option with a lower negative dB value produces larger effects. ON(-3dB), ON(-6dB), OFF 4 Configure the audio output level in [OUTPUT LEVEL]. Here, you specify the gain value of the audio output amplifier from the following 4 levels. +2, +1, 0, -1 5 To mute audio output during PTZ operation, set [MUTE (PAN/TILT, ZOOM)] to "ON" and click SET . Configure the video output terminal to use. You cannot output video signal from the HDMI connector and the MONITOR OUT connector at the same time. 1 In [TERMINAL], select the video connector you want to use. AUTO: A connected connector is detected automatically. HDMI, MONITOR OUT If both the HDMI and the MONITOR OUT connectors are connected in "AUTO" mode, the HDMI connector takes precedence. Working with Administrator Configuration Screens 18/79
-
 1
1 -
2
-
3
-
4
-
5
-
6
-
7
-
8
-
9
-
10
-
11
-
12
-
13
-
14
-
15
-
16
-
17
-
18
-
19
-
20
-
21
-
22
-
23
-
24
-
25
-
26
-
27
-
28
-
29
-
30
-
31
-
32
-
33
-
34
-
35
-
36
-
37
-
38
-
39
-
40
-
41
-
42
-
43
-
44
-
45
-
46
-
47
-
48
-
49
-
50
-
51
-
52
-
53
-
54
-
55
-
56
-
57
-
58
-
 59
59 -
 60
60 -
 61
61 -
 62
62 -
 63
63 -
 64
64 -
 65
65 -
 66
66 -
 67
67 -
 68
68 -
 69
69 -
70
-
71
-
72
-
73
-
74
-
75
-
76
-
77
-
78
-
79
-
80
-
81
-
82
-
83
-
84
-
85
-
86
-
87
-
88
-
89
-
90
-
91
-
92
-
93
-
94
-
95
-
96
-
97
-
98
-
99
-
100
-
101
-
102
-
103
-
104
-
105
-
106
-
107
-
108
-
109
-
110
-
111
-
112
-
113
-
114
-
115
-
116
-
117
-
118
-
119
-
120
-
121
-
122
-
123
-
124
-
125
-
126
-
127
-
128
-
129
-
130
-
131
-
132
-
133
-
134
-
135
-
136
-
137
-
138
-
139
-
140
-
141
-
142
-
143
-
144
-
145
 |
 |
