Sanyo VCC-HD5400 VCC-HD5400 Manual - Page 62
In [FRAME RATE], select the frame rate of the stream.
 |
UPC - 086483075698
View all Sanyo VCC-HD5400 manuals
Add to My Manuals
Save this manual to your list of manuals |
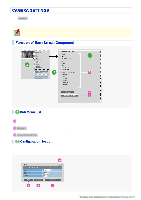
Page 62 highlights
The configured contents are reflected in [RECORD STREAM] on the RECORDING screen. This cannot be configured if the recording configuration ( A - 2 ) at the top of the screen is set to "OFF". 3 In [CODEC], select the image/video compression format. JPEG, H.264 4 In [RESOLUTION], select the display resolution. The available options vary depending on your selections in [ASPECT RATIO] and [CODEC]. JPEG (16:9): 1920×1080, 1280×720, 1024×576, 640×360 JPEG (4:3): 1600×1200, 1280×960, 1024×768, 800×600, 640×480, 320×240 H.264 (16:9): 1920×1080, 1280×720, 640×360, 320×180 H.264 (4:3): 1600×1200, 1280×960, 1024×768, 640×480, 320×240 5 Configuring image clipping (CROPPING) Selecting "ON" causes the VGA-size image at the center of the screen to be clipped and displayed on the live screen on the PC monitor. You cannot select "ON" if you selected "H.264" in [CODEC]. Selecting "ON" in [CROPPING] fixes the [RESOLUTION] value to a VGA-equivalent size ("640x360" in 16:9 aspect ratio or "640x480" in 4:3 aspect ratio). 6 If you selected "H.264" in [CODEC], in [GOP], enter a GOP value. This enables you to specify the GOP setting for the H.264 video stream. 7 In [FRAME RATE], select the frame rate of the stream. The available options vary depending on your selection in [CODEC] and your camera model. JPEG: VCC-HD5400: 0.1ips, 0.2ips, 0.5ips, 1ips, 3ips, 5ips, 10ips, 15ips, 30ips VCC-HD5400P: 0.1ips, 0.2ips, 0.5ips, 1ips, 2.5ips, 5ips, 8ips, 12.5ips, 25ips H.264: VCC-HD5400: 5ips, 10ips, 15ips, 30ips VCC-HD5400P: 5ips, 8ips, 12.5ips, 25ips 8 In [PRIORITY], select whether you put priority on the video/image quality or the bit rate. QUALITY, BIT RATE If you selected "QUALITY", in [PICTURE QUALITY], specify the video/image quality. Then, the system shows an appropriate bit rate depending on the selected quality. BASIC, NORMAL, ENHANCED, FINE, SUPER FINE If you selected "BIT RATE", in [BIT RATE], the system shows an appropriate bit rate for you. Type the bit rate directly, if you want to change it. The setting range is limited depending on the resolution and/or frame rate settings. 3 Click SET in the stream list. The camera restarts, and the registered settings are applied. You may also choose to change the factory-default stream settings (STREAM1 and STREAM2). Working with Administrator Configuration Screens 16/79
-
 1
1 -
2
-
3
-
4
-
5
-
6
-
7
-
8
-
9
-
10
-
11
-
12
-
13
-
14
-
15
-
16
-
17
-
18
-
19
-
20
-
21
-
22
-
23
-
24
-
25
-
26
-
27
-
28
-
29
-
30
-
31
-
32
-
33
-
34
-
35
-
36
-
37
-
38
-
39
-
40
-
41
-
42
-
43
-
44
-
45
-
46
-
47
-
48
-
49
-
50
-
51
-
52
-
53
-
54
-
55
-
56
-
 57
57 -
 58
58 -
 59
59 -
 60
60 -
 61
61 -
 62
62 -
 63
63 -
 64
64 -
 65
65 -
 66
66 -
 67
67 -
68
-
69
-
70
-
71
-
72
-
73
-
74
-
75
-
76
-
77
-
78
-
79
-
80
-
81
-
82
-
83
-
84
-
85
-
86
-
87
-
88
-
89
-
90
-
91
-
92
-
93
-
94
-
95
-
96
-
97
-
98
-
99
-
100
-
101
-
102
-
103
-
104
-
105
-
106
-
107
-
108
-
109
-
110
-
111
-
112
-
113
-
114
-
115
-
116
-
117
-
118
-
119
-
120
-
121
-
122
-
123
-
124
-
125
-
126
-
127
-
128
-
129
-
130
-
131
-
132
-
133
-
134
-
135
-
136
-
137
-
138
-
139
-
140
-
141
-
142
-
143
-
144
-
145
 |
 |
