Sanyo VCC-HD5400 VCC-HD5400 Manual - Page 61
Click, Con the video/image conditions for the stream you want to register and click
 |
UPC - 086483075698
View all Sanyo VCC-HD5400 manuals
Add to My Manuals
Save this manual to your list of manuals |
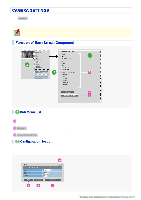
Page 61 highlights
When you have added, changed, or deleted registered information, be sure to click SET in the stream list. Otherwise, changes you made won't be saved and reflected in the stream settings. Clicking SET reboots the camera. Note that the number of registerable streams and configurable settings may be affected by other stream settings. The camera provides two factory default stream patterns (STREAM1 and STREAM2. Besides these, you can register up to two custom stream patterns (STREAM3 and STREAM4). 1 Click ADD . The stream registration screen appears in a separate window. When you register a stream pattern for the first time, the registration screen for "STREAM3" appears. In the stream list ( A ), the currently registered streams are shown. Initially, this list shows video settings for STREAM1 and STREAM2. 2 Configure the video/image conditions for the stream you want to register and click SET . The settings are saved. The stream list now includes the stream you just registered. 1 In [NAME], type the stream name you want. You can type up to 64 alphanumeric characters. 2 In [RECORDING], select the recording type. OFF: NORMAL: ALARM: NORMAL/ALARM: NETWORK FAILURE: No recording Normal live video is recorded. Alarm video is recorded. Normal live video and alarm video are recorded. If a network failure occurs during network recording, backup recording is performed until the failure is resolved. Working with Administrator Configuration Screens 15/79
-
 1
1 -
2
-
3
-
4
-
5
-
6
-
7
-
8
-
9
-
10
-
11
-
12
-
13
-
14
-
15
-
16
-
17
-
18
-
19
-
20
-
21
-
22
-
23
-
24
-
25
-
26
-
27
-
28
-
29
-
30
-
31
-
32
-
33
-
34
-
35
-
36
-
37
-
38
-
39
-
40
-
41
-
42
-
43
-
44
-
45
-
46
-
47
-
48
-
49
-
50
-
51
-
52
-
53
-
54
-
55
-
 56
56 -
 57
57 -
 58
58 -
 59
59 -
 60
60 -
 61
61 -
 62
62 -
 63
63 -
 64
64 -
 65
65 -
 66
66 -
67
-
68
-
69
-
70
-
71
-
72
-
73
-
74
-
75
-
76
-
77
-
78
-
79
-
80
-
81
-
82
-
83
-
84
-
85
-
86
-
87
-
88
-
89
-
90
-
91
-
92
-
93
-
94
-
95
-
96
-
97
-
98
-
99
-
100
-
101
-
102
-
103
-
104
-
105
-
106
-
107
-
108
-
109
-
110
-
111
-
112
-
113
-
114
-
115
-
116
-
117
-
118
-
119
-
120
-
121
-
122
-
123
-
124
-
125
-
126
-
127
-
128
-
129
-
130
-
131
-
132
-
133
-
134
-
135
-
136
-
137
-
138
-
139
-
140
-
141
-
142
-
143
-
144
-
145
 |
 |
