Sanyo VCC-HD5400 VCC-HD5400 Manual - Page 93
Select 1 for [AUTO PAN].
 |
UPC - 086483075698
View all Sanyo VCC-HD5400 manuals
Add to My Manuals
Save this manual to your list of manuals |
Page 93 highlights
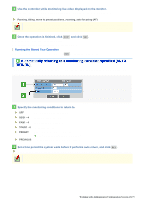
1 Click PTZ to view the PTZ controller. 2 Select "1" for [AUTO PAN]. 3 Use the controller to specify the start position while monitoring live video displayed on the monitor, and click START . The start point has been specified. 4 Specify the end point in the same manner, and click END . The end point has been specified. 5 Set the pause period at the start and end points. 1SEC, 2SEC, 3SEC, 4SEC, 5SEC, 10SEC, 20SEC, 30SEC 6 Configure the panning direction. LEFT (counterclockwise), RIGHT (clockwise) 7 Select a movement speed and click SET . You can confirm the movement speed by clicking TEST . A test operation starts; change the setting values as necessary. 1 (slow) to 15 (quick) Now the settings for the auto pan 1 have been stored. You can follow the same steps to configure for the auto pans 2 to 4. Running the Stored Auto Panning Operation In [AUTO PAN], select a registration number and click RUN to run the specified operation. Auto panning operation starts at the start point with specified tilt, focus and zoom conditions. Auto focus works only when the camera moves slowly or it pauses at the end point for more than five seconds. You can configure up to four patterns of sequential operations such as panning, tilting and zooming. 1 Click PTZ to view the PTZ controller. 2 Select "1" for [TOUR]. 3 Click START , and then YES in the confirmation dialog box. The system starts recording a tour operation. Working with Administrator Configuration Screens 47/79
-
 1
1 -
2
-
3
-
4
-
5
-
6
-
7
-
8
-
9
-
10
-
11
-
12
-
13
-
14
-
15
-
16
-
17
-
18
-
19
-
20
-
21
-
22
-
23
-
24
-
25
-
26
-
27
-
28
-
29
-
30
-
31
-
32
-
33
-
34
-
35
-
36
-
37
-
38
-
39
-
40
-
41
-
42
-
43
-
44
-
45
-
46
-
47
-
48
-
49
-
50
-
51
-
52
-
53
-
54
-
55
-
56
-
57
-
58
-
59
-
60
-
61
-
62
-
63
-
64
-
65
-
66
-
67
-
68
-
69
-
70
-
71
-
72
-
73
-
74
-
75
-
76
-
77
-
78
-
79
-
80
-
81
-
82
-
83
-
84
-
85
-
86
-
87
-
 88
88 -
 89
89 -
 90
90 -
 91
91 -
 92
92 -
 93
93 -
 94
94 -
 95
95 -
 96
96 -
 97
97 -
 98
98 -
99
-
100
-
101
-
102
-
103
-
104
-
105
-
106
-
107
-
108
-
109
-
110
-
111
-
112
-
113
-
114
-
115
-
116
-
117
-
118
-
119
-
120
-
121
-
122
-
123
-
124
-
125
-
126
-
127
-
128
-
129
-
130
-
131
-
132
-
133
-
134
-
135
-
136
-
137
-
138
-
139
-
140
-
141
-
142
-
143
-
144
-
145
 |
 |
