Sanyo VCC-HD5400 VCC-HD5400 Manual - Page 90
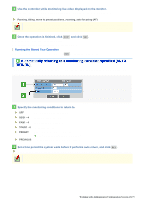
Specify each item for [PRESET NUMBER.1] and click
 |
UPC - 086483075698
View all Sanyo VCC-HD5400 manuals
Add to My Manuals
Save this manual to your list of manuals |
Page 90 highlights
1 Click PTZ to view the PTZ controller. 2 Use the controller to adjust the orientation of the camera lens and the condition of focus or zoom, while monitoring live video displayed on the monitor. 3 Specify each item for [PRESET NUMBER.1] and click SET . The orientation of camera lens, the conditions of focus and zoom, and other settings are saved as "PRESET NUMBER.1". The [USE] check box at the left end is selected automatically, indicating that the setting is enabled. If you save the preset position using the PTZ controller, the check box will be also selected. Deselect the box if you want to disable the preset operation while retaining the setting. A Preset position name (TITLE) Up to 16 alphanumeric characters can be used. B The pause period at a preset position during the sequential operation (TIME). 3SEC, 4SEC, 5SEC, 6SEC, 7SEC, 8SEC, 9SEC, 10SEC, 15SEC, 20SEC, 30SEC, 45SEC, 1MIN C Monitoring conditions at a preset position (VIEW). 1 - 8: Select any from among up to eight patterns of monitoring conditions (camera views) which you set on the CAMERA SETTINGS screen. OFF: Currently used monitoring condition will be applied. D Monitoring condition hold function (HOLD) Even if you perform panning or tilting at a preset position, the monitoring condition set in [VIEW] will be retained. Preset motion or operation in the automatic mode will disable the HOLD function. ON: Enables the hold function. OFF: Disables the hold function. E The group for sequential monitoring (GROUP) If you enable [SEQUENCE] on the AUTO MODE SETTINGS screen, the camera will keep monitoring the preset positions in the same group. 1 - 4 Working with Administrator Configuration Screens 44/79
-
 1
1 -
2
-
3
-
4
-
5
-
6
-
7
-
8
-
9
-
10
-
11
-
12
-
13
-
14
-
15
-
16
-
17
-
18
-
19
-
20
-
21
-
22
-
23
-
24
-
25
-
26
-
27
-
28
-
29
-
30
-
31
-
32
-
33
-
34
-
35
-
36
-
37
-
38
-
39
-
40
-
41
-
42
-
43
-
44
-
45
-
46
-
47
-
48
-
49
-
50
-
51
-
52
-
53
-
54
-
55
-
56
-
57
-
58
-
59
-
60
-
61
-
62
-
63
-
64
-
65
-
66
-
67
-
68
-
69
-
70
-
71
-
72
-
73
-
74
-
75
-
76
-
77
-
78
-
79
-
80
-
81
-
82
-
83
-
84
-
 85
85 -
 86
86 -
 87
87 -
 88
88 -
 89
89 -
 90
90 -
 91
91 -
 92
92 -
 93
93 -
 94
94 -
 95
95 -
96
-
97
-
98
-
99
-
100
-
101
-
102
-
103
-
104
-
105
-
106
-
107
-
108
-
109
-
110
-
111
-
112
-
113
-
114
-
115
-
116
-
117
-
118
-
119
-
120
-
121
-
122
-
123
-
124
-
125
-
126
-
127
-
128
-
129
-
130
-
131
-
132
-
133
-
134
-
135
-
136
-
137
-
138
-
139
-
140
-
141
-
142
-
143
-
144
-
145
 |
 |
