Sanyo VCC-HD5400 VCC-HD5400 Manual - Page 81
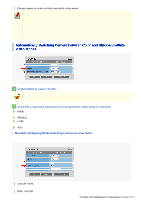
In [GAMMA], select the gamma correction level and click, In [DNR], select ON and click
 |
UPC - 086483075698
View all Sanyo VCC-HD5400 manuals
Add to My Manuals
Save this manual to your list of manuals |
Page 81 highlights
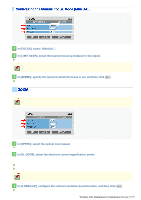
Set the gamma correction level to adjust the contrast or brightness level. In [GAMMA], select the gamma correction level and click SET . 0.45: Gamma correction level = 0.45 1: Gamma correction level = 1 MODE1: Increases the contrast of the whole subject. MODE2: Increases the contrast in dark areas further. The configured settings are applied only to the camera views that were specified in [VIEW]. Selecting "MODE1" or "MODE2" may result in excessively bright images depending on the target object. Configure the DNR (Digital Noise Reduction) function to reduce noise at low conditions. In [DNR], select "ON" and click SET . The configured settings are applied only to the camera views that were specified in [VIEW]. Enabling the DNR function may cause ghosts and blurs if the subject includes any moving object, which results in low resolution. Configure the auto or manual focusing mode. AUTO: Selects the auto focus mode. MANUAL: Selects the manual focus mode (Sets the focusing distance and speed appropriate for the target object). The configured settings are applied in common to all the camera views. Working with Administrator Configuration Screens 35/79
-
 1
1 -
2
-
3
-
4
-
5
-
6
-
7
-
8
-
9
-
10
-
11
-
12
-
13
-
14
-
15
-
16
-
17
-
18
-
19
-
20
-
21
-
22
-
23
-
24
-
25
-
26
-
27
-
28
-
29
-
30
-
31
-
32
-
33
-
34
-
35
-
36
-
37
-
38
-
39
-
40
-
41
-
42
-
43
-
44
-
45
-
46
-
47
-
48
-
49
-
50
-
51
-
52
-
53
-
54
-
55
-
56
-
57
-
58
-
59
-
60
-
61
-
62
-
63
-
64
-
65
-
66
-
67
-
68
-
69
-
70
-
71
-
72
-
73
-
74
-
75
-
 76
76 -
 77
77 -
 78
78 -
 79
79 -
 80
80 -
 81
81 -
 82
82 -
 83
83 -
 84
84 -
 85
85 -
 86
86 -
87
-
88
-
89
-
90
-
91
-
92
-
93
-
94
-
95
-
96
-
97
-
98
-
99
-
100
-
101
-
102
-
103
-
104
-
105
-
106
-
107
-
108
-
109
-
110
-
111
-
112
-
113
-
114
-
115
-
116
-
117
-
118
-
119
-
120
-
121
-
122
-
123
-
124
-
125
-
126
-
127
-
128
-
129
-
130
-
131
-
132
-
133
-
134
-
135
-
136
-
137
-
138
-
139
-
140
-
141
-
142
-
143
-
144
-
145
 |
 |
