Dell PowerEdge 2970 Hardware Owner's Manual - Page 121
Troubleshooting a Damaged System, System was dropped or damaged.
 |
View all Dell PowerEdge 2970 manuals
Add to My Manuals
Save this manual to your list of manuals |
Page 121 highlights
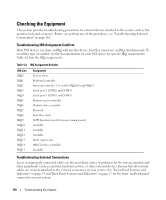
Action CAUTION: Only trained service technicians are authorized to remove the system cover and access any of the components inside the system. Before performing any procedure, see your Product Information Guide for complete information about safety precautions, working inside the computer and protecting against electrostatic discharge. 1 Turn off the system and attached peripherals, and disconnect the system from the electrical outlet. 2 Open the system. See "Opening and Closing the System" on page 55. 3 Remove all expansion cards installed in the system. See "Removing an Expansion Card" on page 74. 4 Let the system dry thoroughly for at least 24 hours. 5 Close the system. See "Opening and Closing the System" on page 55. 6 Reconnect the system to the electrical outlet, and turn on the system and attached peripherals. If the system does not start properly, see "Getting Help" on page 147. 7 If the system starts properly, shut down the system and reinstall all of the expansion cards that you removed. See "Installing an Expansion Card" on page 72. 8 Run the appropriate online diagnostic test. See "Using Server Administrator Diagnostics" on page 135. If the tests fail, see "Getting Help" on page 147. Troubleshooting a Damaged System Problem • System was dropped or damaged. Action CAUTION: Only trained service technicians are authorized to remove the system cover and access any of the components inside the system. Before performing any procedure, see your Product Information Guide for complete information about safety precautions, working inside the computer and protecting against electrostatic discharge. 1 Open the system. See "Opening and Closing the System" on page 55. 2 Ensure that the following components are properly installed: • Expansion cards and risers • Power supplies • Fans • Processors and heat sinks • Memory modules • Drive-carrier connections to the SAS/SATA backplane board, if applicable 3 Ensure that all cables are properly connected. Troubleshooting Your System 121
-
 1
1 -
2
-
3
-
4
-
5
-
6
-
7
-
8
-
9
-
10
-
11
-
12
-
13
-
14
-
15
-
16
-
17
-
18
-
19
-
20
-
21
-
22
-
23
-
24
-
25
-
26
-
27
-
28
-
29
-
30
-
31
-
32
-
33
-
34
-
35
-
36
-
37
-
38
-
39
-
40
-
41
-
42
-
43
-
44
-
45
-
46
-
47
-
48
-
49
-
50
-
51
-
52
-
53
-
54
-
55
-
56
-
57
-
58
-
59
-
60
-
61
-
62
-
63
-
64
-
65
-
66
-
67
-
68
-
69
-
70
-
71
-
72
-
73
-
74
-
75
-
76
-
77
-
78
-
79
-
80
-
81
-
82
-
83
-
84
-
85
-
86
-
87
-
88
-
89
-
90
-
91
-
92
-
93
-
94
-
95
-
96
-
97
-
98
-
99
-
100
-
101
-
102
-
103
-
104
-
105
-
106
-
107
-
108
-
109
-
110
-
111
-
112
-
113
-
114
-
115
-
 116
116 -
 117
117 -
 118
118 -
 119
119 -
 120
120 -
 121
121 -
 122
122 -
 123
123 -
 124
124 -
 125
125 -
 126
126 -
127
-
128
-
129
-
130
-
131
-
132
-
133
-
134
-
135
-
136
-
137
-
138
-
139
-
140
-
141
-
142
-
143
-
144
-
145
-
146
-
147
-
148
-
149
-
150
-
151
-
152
-
153
-
154
-
155
-
156
-
157
-
158
-
159
-
160
-
161
-
162
-
163
-
164
-
165
-
166
-
167
-
168
-
169
-
170
-
171
-
172
-
173
-
174
-
175
-
176
-
177
-
178
-
179
-
180
-
181
-
182
-
183
-
184
-
185
-
186
-
187
-
188
 |
 |
