Dell PowerEdge 2970 Hardware Owner's Manual - Page 59
Replacing a Hard-Drive Carrier, Removing a Hard Drive From a Hard-Drive Carrier - rails
 |
View all Dell PowerEdge 2970 manuals
Add to My Manuals
Save this manual to your list of manuals |
Page 59 highlights
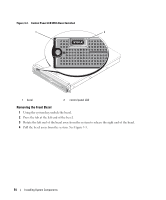
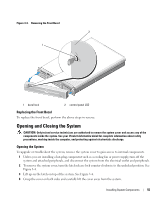
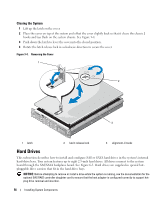
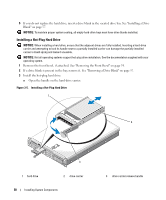
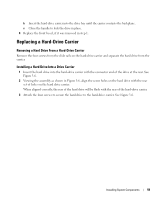
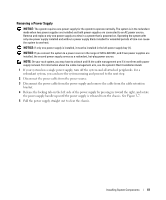
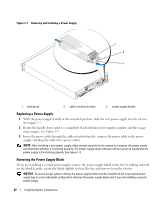
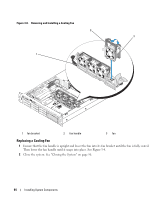
b Insert the hard-drive carrier into the drive bay until the carrier contacts the backplane. c Close the handle to lock the drive in place. 4 Replace the front bezel, if it was removed in step 1. Replacing a Hard-Drive Carrier Removing a Hard Drive From a Hard-Drive Carrier Remove the four screws from the slide rails on the hard-drive carrier and separate the hard drive from the carrier. Installing a Hard Drive Into a Drive Carrier 1 Insert the hard drive into the hard-drive carrier with the connector end of the drive at the rear. See Figure 3-6. 2 Viewing the assembly as shown in Figure 3-6, align the screw holes on the hard drive with the rear set of holes on the hard drive carrier. When aligned correctly, the rear of the hard drive will be flush with the rear of the hard-drive carrier. 3 Attach the four screws to secure the hard drive to the hard-drive carrier. See Figure 3-6. Installing System Components 59
-
 1
1 -
2
-
3
-
4
-
5
-
6
-
7
-
8
-
9
-
10
-
11
-
12
-
13
-
14
-
15
-
16
-
17
-
18
-
19
-
20
-
21
-
22
-
23
-
24
-
25
-
26
-
27
-
28
-
29
-
30
-
31
-
32
-
33
-
34
-
35
-
36
-
37
-
38
-
39
-
40
-
41
-
42
-
43
-
44
-
45
-
46
-
47
-
48
-
49
-
50
-
51
-
52
-
53
-
 54
54 -
 55
55 -
 56
56 -
 57
57 -
 58
58 -
 59
59 -
 60
60 -
 61
61 -
 62
62 -
 63
63 -
 64
64 -
65
-
66
-
67
-
68
-
69
-
70
-
71
-
72
-
73
-
74
-
75
-
76
-
77
-
78
-
79
-
80
-
81
-
82
-
83
-
84
-
85
-
86
-
87
-
88
-
89
-
90
-
91
-
92
-
93
-
94
-
95
-
96
-
97
-
98
-
99
-
100
-
101
-
102
-
103
-
104
-
105
-
106
-
107
-
108
-
109
-
110
-
111
-
112
-
113
-
114
-
115
-
116
-
117
-
118
-
119
-
120
-
121
-
122
-
123
-
124
-
125
-
126
-
127
-
128
-
129
-
130
-
131
-
132
-
133
-
134
-
135
-
136
-
137
-
138
-
139
-
140
-
141
-
142
-
143
-
144
-
145
-
146
-
147
-
148
-
149
-
150
-
151
-
152
-
153
-
154
-
155
-
156
-
157
-
158
-
159
-
160
-
161
-
162
-
163
-
164
-
165
-
166
-
167
-
168
-
169
-
170
-
171
-
172
-
173
-
174
-
175
-
176
-
177
-
178
-
179
-
180
-
181
-
182
-
183
-
184
-
185
-
186
-
187
-
188
 |
 |