Dell PowerEdge 2970 Hardware Owner's Manual - Page 65
SAS Controller Daughter Card, Installing a SAS Controller Daughter Card
 |
View all Dell PowerEdge 2970 manuals
Add to My Manuals
Save this manual to your list of manuals |
Page 65 highlights
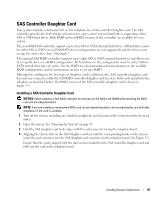
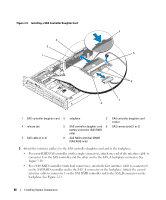
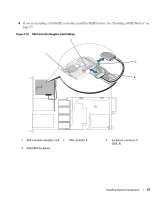
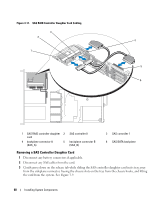
SAS Controller Daughter Card Your system includes a dedicated slot on the sideplane for a SAS controller daughter card. The SAS controller provides the SAS storage subsystem for your system's internal hard drives supporting either SAS or SATA hard drives. Both RAID and non-RAID versions of the controller are available for your system. The non-RAID SAS controller supports up to four SAS or SATA internal hard drives. All hard drives must be either SAS or SATA (mixed SAS/SATA drive configurations are not supported) and the drives must occupy the active drive bays, 0 through 3. The optional SAS RAID controller supports up to eight SAS or SATA internal hard drives and allows you to set up the drives in a RAID configuration. All hard drives in the configuration must be either SAS or SATA and all drive bays are active. See the RAID user documentation for information on the available RAID configurations and for instructions on how to set up a RAID. Although the cabling for the two types of daughter cards is different (the SAS controller daughter card has only one connector, while the SAS RAID controller daughter card has two), both cards install into the sideplane as described below. The RAID version of the SAS controller daughter card is shown in Figure 3-9. Installing a SAS Controller Daughter Card NOTICE: When installing a SAS RAID controller, do not press on the RAID card DIMM while installing the RAID card into the sideplane board. NOTE: If you are installing a replacement RAID card, do not remove the plastic cover protecting the card until after installation of the card is complete. 1 Turn off the system, including any attached peripherals, and disconnect the system from the electrical outlet. 2 Open the system. See "Opening the System" on page 55. 3 Hold the SAS daughter card by its edges with the card connector facing the sideplane board. 4 Aligning the chassis slots on the SAS daughter card tray with the corresponding hooks on the chassis, insert the card connector into the SAS daughter card connector on the sideplane board. See Figure 3-9. Ensure that the card is aligned with the mid-section standoff on the SAS controller daughter card and fully seat the card in the sideplane board. Installing System Components 65
-
 1
1 -
2
-
3
-
4
-
5
-
6
-
7
-
8
-
9
-
10
-
11
-
12
-
13
-
14
-
15
-
16
-
17
-
18
-
19
-
20
-
21
-
22
-
23
-
24
-
25
-
26
-
27
-
28
-
29
-
30
-
31
-
32
-
33
-
34
-
35
-
36
-
37
-
38
-
39
-
40
-
41
-
42
-
43
-
44
-
45
-
46
-
47
-
48
-
49
-
50
-
51
-
52
-
53
-
54
-
55
-
56
-
57
-
58
-
59
-
 60
60 -
 61
61 -
 62
62 -
 63
63 -
 64
64 -
 65
65 -
 66
66 -
 67
67 -
 68
68 -
 69
69 -
 70
70 -
71
-
72
-
73
-
74
-
75
-
76
-
77
-
78
-
79
-
80
-
81
-
82
-
83
-
84
-
85
-
86
-
87
-
88
-
89
-
90
-
91
-
92
-
93
-
94
-
95
-
96
-
97
-
98
-
99
-
100
-
101
-
102
-
103
-
104
-
105
-
106
-
107
-
108
-
109
-
110
-
111
-
112
-
113
-
114
-
115
-
116
-
117
-
118
-
119
-
120
-
121
-
122
-
123
-
124
-
125
-
126
-
127
-
128
-
129
-
130
-
131
-
132
-
133
-
134
-
135
-
136
-
137
-
138
-
139
-
140
-
141
-
142
-
143
-
144
-
145
-
146
-
147
-
148
-
149
-
150
-
151
-
152
-
153
-
154
-
155
-
156
-
157
-
158
-
159
-
160
-
161
-
162
-
163
-
164
-
165
-
166
-
167
-
168
-
169
-
170
-
171
-
172
-
173
-
174
-
175
-
176
-
177
-
178
-
179
-
180
-
181
-
182
-
183
-
184
-
185
-
186
-
187
-
188
 |
 |