Dell PowerEdge 2970 Hardware Owner's Manual - Page 86
Removing the Diskette Drive From the Drive Carrier, Tape Drive Cable Retention Bracket
 |
View all Dell PowerEdge 2970 manuals
Add to My Manuals
Save this manual to your list of manuals |
Page 86 highlights
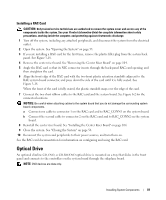
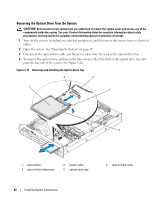
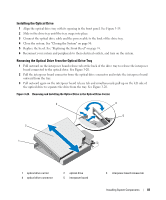
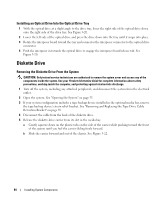
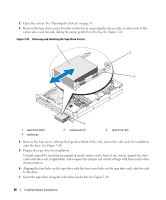
4 Connect the diskette-drive interface cable to the connector on the rear of the diskette drive. If not already done, use the following procedure to attach the other end of the ribbon cable to the system board. a Remove the fan bracket using the procedure in "Removing the Fan Bracket" on page 76. b Locate the diskette-drive connector (FLOPPY) on the system board. See Figure 6-2. c Carefully pry the locking bar on the FLOPPY connector into the unlocked position. d Insert the end of the cable under the locking bar and into the FLOPPY connector as far as it will go. e Keep the cable firmly seated in the connector and press the locking bar back into the locked position. 5 If applicable, reinstall the tape backup device's strain relief bracket. See "Removing and Replacing the Tape Drive Cable Retention Bracket" on page 89. 6 Close the system. See "Closing the System" on page 56. 7 If removed, replace the front bezel. See "Replacing the Front Bezel" on page 55. 8 Reconnect the system and peripherals to their electrical outlets. Removing the Diskette Drive From the Drive Carrier 1 Remove the diskette drive from the system. See "Removing the Diskette Drive From the System" on page 84. 2 Gently draw one side of the carrier away from the diskette drive until the drive pops from the tray. See Figure 3-22. 86 Installing System Components
-
 1
1 -
2
-
3
-
4
-
5
-
6
-
7
-
8
-
9
-
10
-
11
-
12
-
13
-
14
-
15
-
16
-
17
-
18
-
19
-
20
-
21
-
22
-
23
-
24
-
25
-
26
-
27
-
28
-
29
-
30
-
31
-
32
-
33
-
34
-
35
-
36
-
37
-
38
-
39
-
40
-
41
-
42
-
43
-
44
-
45
-
46
-
47
-
48
-
49
-
50
-
51
-
52
-
53
-
54
-
55
-
56
-
57
-
58
-
59
-
60
-
61
-
62
-
63
-
64
-
65
-
66
-
67
-
68
-
69
-
70
-
71
-
72
-
73
-
74
-
75
-
76
-
77
-
78
-
79
-
80
-
 81
81 -
 82
82 -
 83
83 -
 84
84 -
 85
85 -
 86
86 -
 87
87 -
 88
88 -
 89
89 -
 90
90 -
 91
91 -
92
-
93
-
94
-
95
-
96
-
97
-
98
-
99
-
100
-
101
-
102
-
103
-
104
-
105
-
106
-
107
-
108
-
109
-
110
-
111
-
112
-
113
-
114
-
115
-
116
-
117
-
118
-
119
-
120
-
121
-
122
-
123
-
124
-
125
-
126
-
127
-
128
-
129
-
130
-
131
-
132
-
133
-
134
-
135
-
136
-
137
-
138
-
139
-
140
-
141
-
142
-
143
-
144
-
145
-
146
-
147
-
148
-
149
-
150
-
151
-
152
-
153
-
154
-
155
-
156
-
157
-
158
-
159
-
160
-
161
-
162
-
163
-
164
-
165
-
166
-
167
-
168
-
169
-
170
-
171
-
172
-
173
-
174
-
175
-
176
-
177
-
178
-
179
-
180
-
181
-
182
-
183
-
184
-
185
-
186
-
187
-
188
 |
 |