Epson Stylus Pro 9000 User Manual - Page 110
document. Applicable in Roll Paper Banner mode EPSON Stylus
 |
View all Epson Stylus Pro 9000 manuals
Add to My Manuals
Save this manual to your list of manuals |
Page 110 highlights
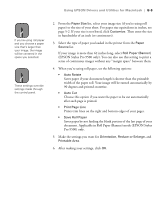
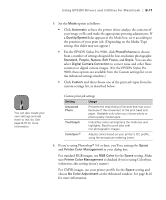
Using EPSON Drivers and Utilities for Macintosh | B-9 Note If you're using roll paper and you choose a paper size that's larger than your image, the image will be centered in the space you selected. Note These settings override settings made through the control panel. 2. From the Paper Size list, select your image size (if you're using roll paper) or the size of your sheet. For paper size equivalents in inches, see page 5-2. If your size is not listed, click Customize. Then enter the size in hundredths of an inch (or centimeters). 3. Select the type of paper you loaded in the printer from the Paper Source list. If your image is more than 62 inches long, select Roll Paper (Banner) (EPSON Stylus Pro 9500 only). You can also use this setting to print a series of continuous images without any "margin space" between them. 4. When you're using roll paper, set the following options: • Auto Rotate Saves paper if your document length is shorter than the printable width of the paper roll. Your image will be turned automatically by 90 degrees and printed crosswise. • Auto Cut Choose this option if you want the paper to be cut automatically after each page is printed. • Print Page Line Prints trim lines on the right and bottom edges of your pages. • Save Roll Paper Saves paper by not feeding the blank portion of the last page of your document. Applicable in Roll Paper (Banner) mode (EPSON Stylus Pro 9500) only. 5. Make the settings you want for Orientation, Reduce or Enlarge, and Printable Area. 6. After making your settings, click OK. B-9
-
 1
1 -
2
-
3
-
4
-
5
-
6
-
7
-
8
-
9
-
10
-
11
-
12
-
13
-
14
-
15
-
16
-
17
-
18
-
19
-
20
-
21
-
22
-
23
-
24
-
25
-
26
-
27
-
28
-
29
-
30
-
31
-
32
-
33
-
34
-
35
-
36
-
37
-
38
-
39
-
40
-
41
-
42
-
43
-
44
-
45
-
46
-
47
-
48
-
49
-
50
-
51
-
52
-
53
-
54
-
55
-
56
-
57
-
58
-
59
-
60
-
61
-
62
-
63
-
64
-
65
-
66
-
67
-
68
-
69
-
70
-
71
-
72
-
73
-
74
-
75
-
76
-
77
-
78
-
79
-
80
-
81
-
82
-
83
-
84
-
85
-
86
-
87
-
88
-
89
-
90
-
91
-
92
-
93
-
94
-
95
-
96
-
97
-
98
-
99
-
100
-
101
-
102
-
103
-
104
-
 105
105 -
 106
106 -
 107
107 -
 108
108 -
 109
109 -
 110
110 -
 111
111 -
 112
112 -
 113
113 -
 114
114 -
 115
115 -
116
-
117
-
118
-
119
-
120
-
121
-
122
-
123
-
124
-
125
-
126
-
127
-
128
-
129
-
130
-
131
-
132
-
133
-
134
-
135
-
136
-
137
-
138
-
139
-
140
-
141
-
142
-
143
-
144
-
145
-
146
-
147
-
148
-
149
-
150
-
151
-
152
-
153
-
154
-
155
-
156
-
157
-
158
-
159
-
160
-
161
-
162
-
163
-
164
-
165
 |
 |
