Epson Stylus Pro 9000 User Manual - Page 145
four Color Adjustment modes, as shown in the table on C-19., Gamma settings
 |
View all Epson Stylus Pro 9000 manuals
Add to My Manuals
Save this manual to your list of manuals |
Page 145 highlights
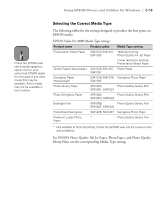
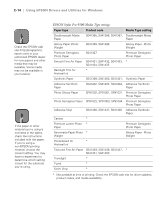
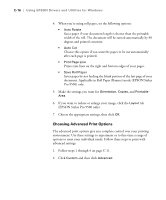
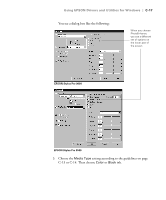
C-18 | Using EPSON Drivers and Utilities for Windows 4. Choose one of the following Print Quality settings: • Normal - 360dpi • Fine - 720dpi • Superfine - 1440dpi The available print quality settings may be limited by the Media Type setting. Choose lower print quality for faster printing, or Superfine 1440dpi for best quality. 5. Choose any of the following: • Super MicroWeave The MicroWeave and Super MicroWeave settings eliminate unwanted banding effects. These settings are automatically selected for all media types except plain paper. • High Speed For fast, bidirectional printing at lower quality. If vertical lines in your printout are misaligned when you use the High Speed setting, you may need to turn it off or align the print head. • Flip Horizontal For printing a mirror image of your file. Use with backlight film. 6. Choose one of the following Color Management configurations: • Color Controls (Color Adjustment) This configuration lets you specify individual values for adjusting brightness, contrast, saturation, and CMY inks, or choose from the four Color Adjustment modes, as shown in the table on page C-19. (For the EPSON Stylus Pro 9500, you can also choose from three Gamma settings, which control image contrast by modifying the midtones and midlevel grays.) When you print on EPSON backlight film, choose Vivid mode and +10 Saturation. • PhotoEnhance4 (PhotoEnhance3) Produces sharper images and more vivid colors by automatically adjusting the contrast, saturation, and brightness. Corrects for overall under- or over-exposure of the original image. When you choose this configuration, you see a sample image that reflects the settings you choose. See page C-20 for a description of the settings. C-18
-
 1
1 -
2
-
3
-
4
-
5
-
6
-
7
-
8
-
9
-
10
-
11
-
12
-
13
-
14
-
15
-
16
-
17
-
18
-
19
-
20
-
21
-
22
-
23
-
24
-
25
-
26
-
27
-
28
-
29
-
30
-
31
-
32
-
33
-
34
-
35
-
36
-
37
-
38
-
39
-
40
-
41
-
42
-
43
-
44
-
45
-
46
-
47
-
48
-
49
-
50
-
51
-
52
-
53
-
54
-
55
-
56
-
57
-
58
-
59
-
60
-
61
-
62
-
63
-
64
-
65
-
66
-
67
-
68
-
69
-
70
-
71
-
72
-
73
-
74
-
75
-
76
-
77
-
78
-
79
-
80
-
81
-
82
-
83
-
84
-
85
-
86
-
87
-
88
-
89
-
90
-
91
-
92
-
93
-
94
-
95
-
96
-
97
-
98
-
99
-
100
-
101
-
102
-
103
-
104
-
105
-
106
-
107
-
108
-
109
-
110
-
111
-
112
-
113
-
114
-
115
-
116
-
117
-
118
-
119
-
120
-
121
-
122
-
123
-
124
-
125
-
126
-
127
-
128
-
129
-
130
-
131
-
132
-
133
-
134
-
135
-
136
-
137
-
138
-
139
-
 140
140 -
 141
141 -
 142
142 -
 143
143 -
 144
144 -
 145
145 -
 146
146 -
 147
147 -
 148
148 -
 149
149 -
 150
150 -
151
-
152
-
153
-
154
-
155
-
156
-
157
-
158
-
159
-
160
-
161
-
162
-
163
-
164
-
165
 |
 |