Epson Stylus Pro 9000 User Manual - Page 52
Turning Off Paper Monitoring Features, Selecting the Printer’s Interface, Enter, SelecType
 |
View all Epson Stylus Pro 9000 manuals
Add to My Manuals
Save this manual to your list of manuals |
Page 52 highlights
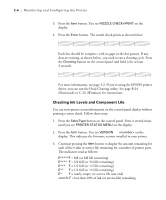
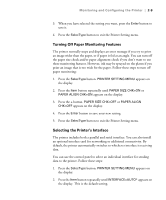
Monitoring and Configuring the Printer | 2-9 3. When you have selected the setting you want, press the Enter button to save it. 4. Press the SelecType button to exit the Printer Setting menu. Turning Off Paper Monitoring Features The printer normally stops and displays an error message if you try to print an image wider than the paper, or if paper is fed at an angle. You can turn off the paper size check and/or paper alignment check if you don't want to use these monitoring features. However, ink may be sprayed on the platen if you print an image that is too wide for the paper. Follow these steps to turn off paper monitoring: 1. Press the SelecType button. PRINTER SETTING MENU appears on the display. 2. Press the Item button repeatedly until PAPER SIZE CHK=ON or PAPER ALIGN CHK=ON appears on the display. 3. Press the + button. PAPER SIZE CHK=OFF or PAPER ALIGN CHK=OFF appears on the display. 4. Press the Enter button to save your new setting. 5. Press the SelecType button to exit the Printer Setting menu. Selecting the Printer's Interface The printer includes both a parallel and serial interface. You can also install an optional interface card for networking or additional connectivity. By default, the printer automatically switches to whichever interface is receiving data. You can use the control panel to select an individual interface for sending data to the printer. Follow these steps: 1. Press the SelecType button. PRINTER SETTING MENU appears on the display. 2. Press the Item button repeatedly until INTERFACE=AUTO* appears on the display. This is the default setting. 2-9
-
 1
1 -
2
-
3
-
4
-
5
-
6
-
7
-
8
-
9
-
10
-
11
-
12
-
13
-
14
-
15
-
16
-
17
-
18
-
19
-
20
-
21
-
22
-
23
-
24
-
25
-
26
-
27
-
28
-
29
-
30
-
31
-
32
-
33
-
34
-
35
-
36
-
37
-
38
-
39
-
40
-
41
-
42
-
43
-
44
-
45
-
46
-
 47
47 -
 48
48 -
 49
49 -
 50
50 -
 51
51 -
 52
52 -
 53
53 -
 54
54 -
 55
55 -
 56
56 -
 57
57 -
58
-
59
-
60
-
61
-
62
-
63
-
64
-
65
-
66
-
67
-
68
-
69
-
70
-
71
-
72
-
73
-
74
-
75
-
76
-
77
-
78
-
79
-
80
-
81
-
82
-
83
-
84
-
85
-
86
-
87
-
88
-
89
-
90
-
91
-
92
-
93
-
94
-
95
-
96
-
97
-
98
-
99
-
100
-
101
-
102
-
103
-
104
-
105
-
106
-
107
-
108
-
109
-
110
-
111
-
112
-
113
-
114
-
115
-
116
-
117
-
118
-
119
-
120
-
121
-
122
-
123
-
124
-
125
-
126
-
127
-
128
-
129
-
130
-
131
-
132
-
133
-
134
-
135
-
136
-
137
-
138
-
139
-
140
-
141
-
142
-
143
-
144
-
145
-
146
-
147
-
148
-
149
-
150
-
151
-
152
-
153
-
154
-
155
-
156
-
157
-
158
-
159
-
160
-
161
-
162
-
163
-
164
-
165
 |
 |