Epson Stylus Pro 9000 User Manual - Page 32
Printing Trim Lines, Using Cut Sheet Paper
 |
View all Epson Stylus Pro 9000 manuals
Add to My Manuals
Save this manual to your list of manuals |
Page 32 highlights
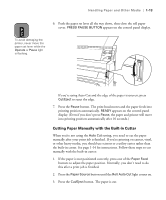
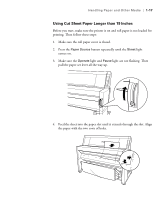
Handling Paper and Other Media | 1-15 Printing Trim Lines You can have trim lines printed on the right edge of your images or pages (if you're using Auto Cut) or on the right and bottom edge (if you're not using auto cut). Follow these steps: 1. Press the SelecType button. PRINTER SETTING MENU appears on the display. 2. Press the Item button until PAGE LINE=OFF appears on the display. 3. Press the + button. PAGE LINE=ON appears on the display. 4. Press the Enter button to save the new setting. 5. Press the SelecType button to exit the Printer Setting menu. If you're using the RIP Station 5100 or the EPSON printer driver, you can also specify trim lines through your print options. See the RIP Station 5100 User Guide or Appendix B or C in this manual for more information. Using Cut Sheet Paper You can print on many types of cut sheet paper and other media. The printer accepts sheets ranging from 11 × 17 inches to 44 × 62.2 inches. You can leave your roll paper in the printer when you print on cut sheets; make sure it is rolled up and fastened with the roll paper belt(s), as described on page 1-9. If you're using stock more than 19 inches long or 19 mil (0.5 mm) thick, see the following sections for additional instructions. You will not be able to follow the "autoload" procedure described in this section. 1-15
-
 1
1 -
2
-
3
-
4
-
5
-
6
-
7
-
8
-
9
-
10
-
11
-
12
-
13
-
14
-
15
-
16
-
17
-
18
-
19
-
20
-
21
-
22
-
23
-
24
-
25
-
26
-
 27
27 -
 28
28 -
 29
29 -
 30
30 -
 31
31 -
 32
32 -
 33
33 -
 34
34 -
 35
35 -
 36
36 -
 37
37 -
38
-
39
-
40
-
41
-
42
-
43
-
44
-
45
-
46
-
47
-
48
-
49
-
50
-
51
-
52
-
53
-
54
-
55
-
56
-
57
-
58
-
59
-
60
-
61
-
62
-
63
-
64
-
65
-
66
-
67
-
68
-
69
-
70
-
71
-
72
-
73
-
74
-
75
-
76
-
77
-
78
-
79
-
80
-
81
-
82
-
83
-
84
-
85
-
86
-
87
-
88
-
89
-
90
-
91
-
92
-
93
-
94
-
95
-
96
-
97
-
98
-
99
-
100
-
101
-
102
-
103
-
104
-
105
-
106
-
107
-
108
-
109
-
110
-
111
-
112
-
113
-
114
-
115
-
116
-
117
-
118
-
119
-
120
-
121
-
122
-
123
-
124
-
125
-
126
-
127
-
128
-
129
-
130
-
131
-
132
-
133
-
134
-
135
-
136
-
137
-
138
-
139
-
140
-
141
-
142
-
143
-
144
-
145
-
146
-
147
-
148
-
149
-
150
-
151
-
152
-
153
-
154
-
155
-
156
-
157
-
158
-
159
-
160
-
161
-
162
-
163
-
164
-
165
 |
 |