Epson Stylus Pro 9000 User Manual - Page 61
Maintaining and Transporting the Printer, paper, choose the average or most frequent number
 |
View all Epson Stylus Pro 9000 manuals
Add to My Manuals
Save this manual to your list of manuals |
Page 61 highlights
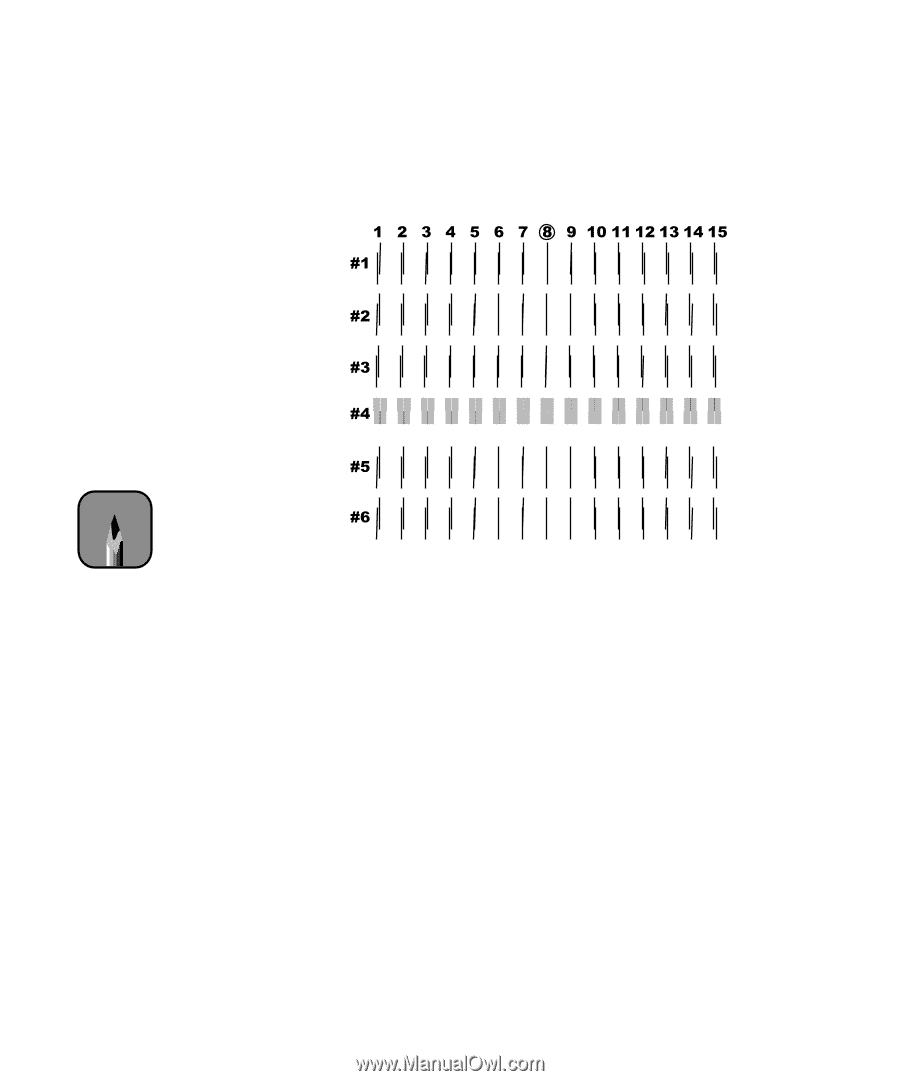
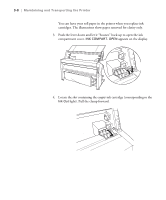
3-6 | Maintaining and Transporting the Printer • For the EPSON Stylus Pro 9500, examine row #1 and determine which line or box number has the smallest gaps. In the example below, line 8 has the smallest gaps in row 1. EPSON Stylus Pro 9500 Alignment Patterns Note If row 4 (EPSON Stylus Pro 9000) or line 8 (EPSON Stylus Pro 9500) shows the smallest gaps for all the sets, the head is aligned. Press Pause to exit head alignment mode. 2. Check the control panel display. Use the + or - button to select the best aligned row or line for pattern #1. Then press the Enter button to register the setting. 3. Repeat steps 1 and 2 for each pattern. If you can't make a consistent choice as you look across the width of the paper, choose the average or most frequent number, then print the pattern again. Press Enter to cycle through the patterns until you reach the one you want to repeat. 4. After you have registered all the patterns, press the Pause button to exit head alignment mode and return to normal printer operation. 3-6
-
 1
1 -
2
-
3
-
4
-
5
-
6
-
7
-
8
-
9
-
10
-
11
-
12
-
13
-
14
-
15
-
16
-
17
-
18
-
19
-
20
-
21
-
22
-
23
-
24
-
25
-
26
-
27
-
28
-
29
-
30
-
31
-
32
-
33
-
34
-
35
-
36
-
37
-
38
-
39
-
40
-
41
-
42
-
43
-
44
-
45
-
46
-
47
-
48
-
49
-
50
-
51
-
52
-
53
-
54
-
55
-
 56
56 -
 57
57 -
 58
58 -
 59
59 -
 60
60 -
 61
61 -
 62
62 -
 63
63 -
 64
64 -
 65
65 -
 66
66 -
67
-
68
-
69
-
70
-
71
-
72
-
73
-
74
-
75
-
76
-
77
-
78
-
79
-
80
-
81
-
82
-
83
-
84
-
85
-
86
-
87
-
88
-
89
-
90
-
91
-
92
-
93
-
94
-
95
-
96
-
97
-
98
-
99
-
100
-
101
-
102
-
103
-
104
-
105
-
106
-
107
-
108
-
109
-
110
-
111
-
112
-
113
-
114
-
115
-
116
-
117
-
118
-
119
-
120
-
121
-
122
-
123
-
124
-
125
-
126
-
127
-
128
-
129
-
130
-
131
-
132
-
133
-
134
-
135
-
136
-
137
-
138
-
139
-
140
-
141
-
142
-
143
-
144
-
145
-
146
-
147
-
148
-
149
-
150
-
151
-
152
-
153
-
154
-
155
-
156
-
157
-
158
-
159
-
160
-
161
-
162
-
163
-
164
-
165
 |
 |