Epson Stylus Pro 9000 User Manual - Page 68
be removed., Carefully remove the cutter blade from the printer.
 |
View all Epson Stylus Pro 9000 manuals
Add to My Manuals
Save this manual to your list of manuals |
Page 68 highlights
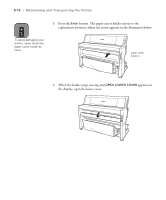
Maintaining and Transporting the Printer | 3-13 5. When REPLACE CUTTER appears on the display, you can open the casing. Push in the side pin while turning the paper cutter cover to the right. Note Be careful not to let the cutter or the spring coil pop out of the casing. cutter blade casing 6. Slowly take your finger off the side pin. The paper cutter raises so it can be removed. 7. Carefully remove the cutter blade from the printer. 3-13
-
 1
1 -
2
-
3
-
4
-
5
-
6
-
7
-
8
-
9
-
10
-
11
-
12
-
13
-
14
-
15
-
16
-
17
-
18
-
19
-
20
-
21
-
22
-
23
-
24
-
25
-
26
-
27
-
28
-
29
-
30
-
31
-
32
-
33
-
34
-
35
-
36
-
37
-
38
-
39
-
40
-
41
-
42
-
43
-
44
-
45
-
46
-
47
-
48
-
49
-
50
-
51
-
52
-
53
-
54
-
55
-
56
-
57
-
58
-
59
-
60
-
61
-
62
-
 63
63 -
 64
64 -
 65
65 -
 66
66 -
 67
67 -
 68
68 -
 69
69 -
 70
70 -
 71
71 -
 72
72 -
 73
73 -
74
-
75
-
76
-
77
-
78
-
79
-
80
-
81
-
82
-
83
-
84
-
85
-
86
-
87
-
88
-
89
-
90
-
91
-
92
-
93
-
94
-
95
-
96
-
97
-
98
-
99
-
100
-
101
-
102
-
103
-
104
-
105
-
106
-
107
-
108
-
109
-
110
-
111
-
112
-
113
-
114
-
115
-
116
-
117
-
118
-
119
-
120
-
121
-
122
-
123
-
124
-
125
-
126
-
127
-
128
-
129
-
130
-
131
-
132
-
133
-
134
-
135
-
136
-
137
-
138
-
139
-
140
-
141
-
142
-
143
-
144
-
145
-
146
-
147
-
148
-
149
-
150
-
151
-
152
-
153
-
154
-
155
-
156
-
157
-
158
-
159
-
160
-
161
-
162
-
163
-
164
-
165
 |
 |

3-13
Maintaining and Transporting the Printer
|
3-13
5.
When
REPLACE CUTTER
appears on the display, you can open the
casing. Push in the side pin while turning the paper cutter cover to the
right.
6.
Slowly take your finger off the side pin. The paper cutter raises so it can
be removed.
7.
Carefully remove the cutter blade from the printer.
cutter blade casing
Note
Be careful not to let the
cutter or the spring coil
pop out of the casing.