Epson Stylus Pro 9000 User Manual - Page 129
Using EPSON Drivers and Utilities for Windows, configuration
 |
View all Epson Stylus Pro 9000 manuals
Add to My Manuals
Save this manual to your list of manuals |
Page 129 highlights
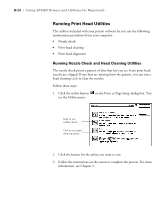
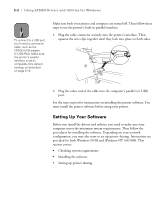
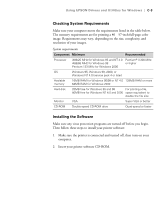
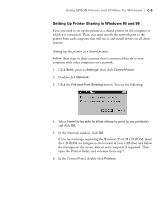
C-2 | Using EPSON Drivers and Utilities for Windows Note To connect to a USB port, you'll need a conversion cable, such as the EPSON USB adapter (C-USB-PK4). Make sure the printer's parallel interface is set to compatible (the default setting), as described on page 2-10. Make sure both your printer and computer are turned off. Then follow these steps to use the printer's built-in parallel interface: 1. Plug the cable connector securely into the printer's interface. Then squeeze the wire clips together until they lock into place on both sides. 2. Plug the other end of the cable into the computer's parallel (or USB) port. See the next section for instructions on installing the printer software. You must install the printer software before using your printer. Setting Up Your Software Before you install the drivers and utilities, you need to make sure your computer meets the minimum system requirements. Then follow the procedures for installing the software. Depending on your network configuration, you may also want to set up printer sharing. Instructions are provided for both Windows 95/98 and Windows NT 4.0/2000. This section covers: • Checking system requirements • Installing the software • Setting up printer sharing C-2
-
 1
1 -
2
-
3
-
4
-
5
-
6
-
7
-
8
-
9
-
10
-
11
-
12
-
13
-
14
-
15
-
16
-
17
-
18
-
19
-
20
-
21
-
22
-
23
-
24
-
25
-
26
-
27
-
28
-
29
-
30
-
31
-
32
-
33
-
34
-
35
-
36
-
37
-
38
-
39
-
40
-
41
-
42
-
43
-
44
-
45
-
46
-
47
-
48
-
49
-
50
-
51
-
52
-
53
-
54
-
55
-
56
-
57
-
58
-
59
-
60
-
61
-
62
-
63
-
64
-
65
-
66
-
67
-
68
-
69
-
70
-
71
-
72
-
73
-
74
-
75
-
76
-
77
-
78
-
79
-
80
-
81
-
82
-
83
-
84
-
85
-
86
-
87
-
88
-
89
-
90
-
91
-
92
-
93
-
94
-
95
-
96
-
97
-
98
-
99
-
100
-
101
-
102
-
103
-
104
-
105
-
106
-
107
-
108
-
109
-
110
-
111
-
112
-
113
-
114
-
115
-
116
-
117
-
118
-
119
-
120
-
121
-
122
-
123
-
 124
124 -
 125
125 -
 126
126 -
 127
127 -
 128
128 -
 129
129 -
 130
130 -
 131
131 -
 132
132 -
 133
133 -
 134
134 -
135
-
136
-
137
-
138
-
139
-
140
-
141
-
142
-
143
-
144
-
145
-
146
-
147
-
148
-
149
-
150
-
151
-
152
-
153
-
154
-
155
-
156
-
157
-
158
-
159
-
160
-
161
-
162
-
163
-
164
-
165
 |
 |