Epson Stylus Pro 9000 User Manual - Page 112
Using EPSON Drivers and Utilities for Macintosh, For the EPSON Stylus Pro 9500, click
 |
View all Epson Stylus Pro 9000 manuals
Add to My Manuals
Save this manual to your list of manuals |
Page 112 highlights
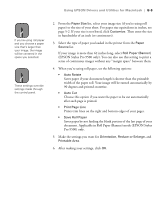
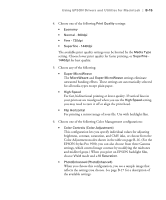
Using EPSON Drivers and Utilities for Macintosh | B-11 Note You can also create your own settings and add them to this list. See page B-16 for more information. 5. Set the Mode option as follows: • Click Automatic to have the printer driver analyze the contents of your image or file and make the appropriate printing adjustments. If a Quality/Speed slider appears in the Mode box, set it according to the priorities of your print job. (Depending on the Media Type setting, this slider may not appear.) • For the EPSON Stylus Pro 9500, click PhotoEnhance to choose from a number of settings designed for low-resolution photographs: Standard, People, Nature, Soft Focus, and Sepia. You can also select Digital Camera Correction to correct noise and other flaws common to digital camera images. (For the EPSON Stylus Pro 9000, these options are available from the Custom settings list or on the Advanced settings window.) • Click Custom and then choose one of the print job types from the custom settings list, as described below. Custom print job settings Setting Usage Advanced Photo Prevents the misprinting of ink dots that may occur because of the movement of the print head and paper. Available only when you choose photo or photo-quality media types. Text/Graph Intensifies colors and lightens the midtones and highlights. Best for print jobs with non-photographic images. ColorSync® Adjusts colors based on your printer's ICC profile, using the perceptual rendering intent. 6. If you're using Photoshop® 5.0 or later, you'll see settings for Space and Printer Color Management in your dialog box. For standard RGB images, use RGB Color for the Space setting. Make sure Printer Color Management is checked if you're using ColorSync. (otherwise, this setting doesn't matter). For CMYK images, use your printer profile for the Space setting and choose No Color Adjustment on the Advanced window. See page B-16 for more information. B-11
-
 1
1 -
2
-
3
-
4
-
5
-
6
-
7
-
8
-
9
-
10
-
11
-
12
-
13
-
14
-
15
-
16
-
17
-
18
-
19
-
20
-
21
-
22
-
23
-
24
-
25
-
26
-
27
-
28
-
29
-
30
-
31
-
32
-
33
-
34
-
35
-
36
-
37
-
38
-
39
-
40
-
41
-
42
-
43
-
44
-
45
-
46
-
47
-
48
-
49
-
50
-
51
-
52
-
53
-
54
-
55
-
56
-
57
-
58
-
59
-
60
-
61
-
62
-
63
-
64
-
65
-
66
-
67
-
68
-
69
-
70
-
71
-
72
-
73
-
74
-
75
-
76
-
77
-
78
-
79
-
80
-
81
-
82
-
83
-
84
-
85
-
86
-
87
-
88
-
89
-
90
-
91
-
92
-
93
-
94
-
95
-
96
-
97
-
98
-
99
-
100
-
101
-
102
-
103
-
104
-
105
-
106
-
 107
107 -
 108
108 -
 109
109 -
 110
110 -
 111
111 -
 112
112 -
 113
113 -
 114
114 -
 115
115 -
 116
116 -
 117
117 -
118
-
119
-
120
-
121
-
122
-
123
-
124
-
125
-
126
-
127
-
128
-
129
-
130
-
131
-
132
-
133
-
134
-
135
-
136
-
137
-
138
-
139
-
140
-
141
-
142
-
143
-
144
-
145
-
146
-
147
-
148
-
149
-
150
-
151
-
152
-
153
-
154
-
155
-
156
-
157
-
158
-
159
-
160
-
161
-
162
-
163
-
164
-
165
 |
 |
