Epson Stylus Pro 9000 User Manual - Page 56
Maintaining and Transporting the Printer, Running a Nozzle Check - clean print head
 |
View all Epson Stylus Pro 9000 manuals
Add to My Manuals
Save this manual to your list of manuals |
Page 56 highlights
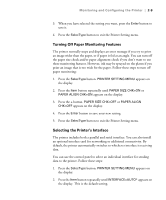
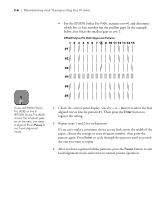
Chapter 3: Maintaining and Transporting the Printer The EPSON Stylus Pro 9000 series printers require very little maintenance to keep working at their best. This chapter describes the following routine procedures: • Running a nozzle check • Running a cleaning cycle • Aligning the print head • Replacing ink cartridges • Replacing the paper cutter blade • Cleaning the printer • Transporting the printer • Replacing the waste ink system Running a Nozzle Check The nozzle check prints a pattern of dots that lets you see if any print head nozzles are clogged. If any dots are missing, you can run a cleaning cycle to clear the nozzles. Follow these steps to print the nozzle check: 1. Load a sheet of paper in the printer, following the instructions on page 1-15. (You can print the nozzle check on roll paper, but you will use more paper.) 2. Press the SelecType button on the control panel until you see TEST PRINT MENU on the display. 3. Press the Item button. You see NOZZLE CHECK=PRINT on the display. 1
-
 1
1 -
2
-
3
-
4
-
5
-
6
-
7
-
8
-
9
-
10
-
11
-
12
-
13
-
14
-
15
-
16
-
17
-
18
-
19
-
20
-
21
-
22
-
23
-
24
-
25
-
26
-
27
-
28
-
29
-
30
-
31
-
32
-
33
-
34
-
35
-
36
-
37
-
38
-
39
-
40
-
41
-
42
-
43
-
44
-
45
-
46
-
47
-
48
-
49
-
50
-
 51
51 -
 52
52 -
 53
53 -
 54
54 -
 55
55 -
 56
56 -
 57
57 -
 58
58 -
 59
59 -
 60
60 -
 61
61 -
62
-
63
-
64
-
65
-
66
-
67
-
68
-
69
-
70
-
71
-
72
-
73
-
74
-
75
-
76
-
77
-
78
-
79
-
80
-
81
-
82
-
83
-
84
-
85
-
86
-
87
-
88
-
89
-
90
-
91
-
92
-
93
-
94
-
95
-
96
-
97
-
98
-
99
-
100
-
101
-
102
-
103
-
104
-
105
-
106
-
107
-
108
-
109
-
110
-
111
-
112
-
113
-
114
-
115
-
116
-
117
-
118
-
119
-
120
-
121
-
122
-
123
-
124
-
125
-
126
-
127
-
128
-
129
-
130
-
131
-
132
-
133
-
134
-
135
-
136
-
137
-
138
-
139
-
140
-
141
-
142
-
143
-
144
-
145
-
146
-
147
-
148
-
149
-
150
-
151
-
152
-
153
-
154
-
155
-
156
-
157
-
158
-
159
-
160
-
161
-
162
-
163
-
164
-
165
 |
 |